Showing posts with label cosplay. Show all posts

Thursday, January 19, 2012

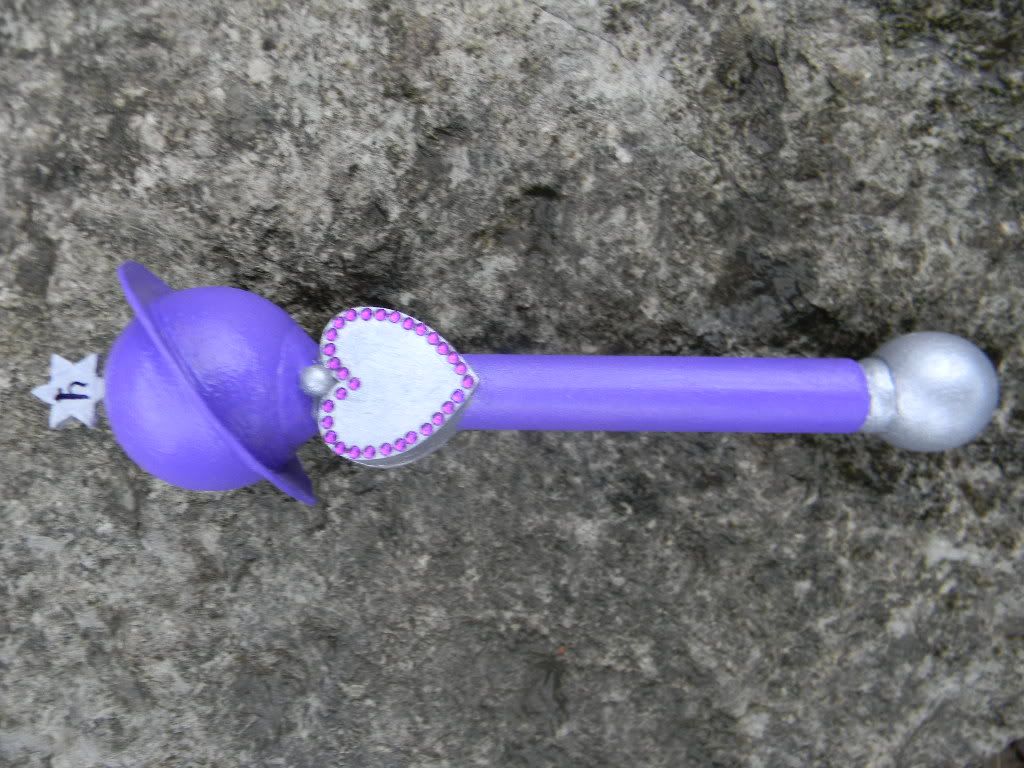
Let's Make Cosplay: Transformation Wand


Ever wanted to make a transformation wand? A friend requested this prop and bam, here it is! You can find the video for it here! http://www.youtube.com/watch?v=MOgQGGOCoCg

The materials I used were wood rod balls and hearts, friendly plastic, four 1" Philips head wood screws, 1mm. and 3 mm. PCV sheeting, gray paint, sliver paint, purple paint, nail decorations (rhinestones), and gloss varnish.

The tools I used were a saw, a heat gun, a file, a hot knife, a box cutter, a marker, a circle template, some super glue, some paint brushes, and sponge brushes.

I’ve never made a prop like this before so I tried my best. Instead of crafting a lot of the parts by hand I opted to use a lot of wood bits that were already carved. I purchased some wooden balls and a wooden heart piece for the prop.

Since the balls came with holes already drilled into a section of it, I figured I would use those holes to mount them into the handle. I expanded the holes at the bottom of the balls and then mounted a screw into holes. What I basically did was put a screw into the bottom of the hole before I filled the hole with friendly plastic to hold the screws in place so they wouldn’t move. After that, I drilled holes into the dowel rod and twisted the knobs into the dowel rods to get them on and secure.

At the base of the handle, I used the rasp and file to carve a groove into the dowel rod right above where the ball attaches. I cut and sanded it out as best I could. After that small step, I got a whole mess of friendly plastic and the two wooden hearts I purchased. I started by sticking one heart in place with the friendly plastic and tried to center it as best as I could before I did the same with the other side with the wood heart. I tried to make it parallel as best as I could and left a tiny bit above the sphere to do details.

As a note, it stinks to use filler to do shaping work because it is hard to see. When you paint it filler shows all the problems that you made so you need to make sure you do a perfect job when shaping filler.
After that, I progressed to the ring around Saturn. I used a circle template and figured out how big the size of the ball was and how big I wanted the ring to be. The ring’s total diameter was 3 inches. I took the circle template and drew a circle for the sphere.

On the template it shows how to do a cross and extend it past the circle. You can draw your inner circle and then you can draw an outer circle that lines up correctly with the inner circle and keeps it centered. I cut the circle out of 1 millimeter PVC Sheeting. You can cut this material with scissors. I opted to cut the material with scissors for the outside but I used the hot knife for the inside to make it smoother so it would fit well around the ball it was going around. It is best to use hot knife to cut curves or execute precision work.
When he cut out the circle I cut the inside a little smaller than what I drew it as so that it would be slightly smaller than the ball. This was to ensure a snug fit against the ball. After this was done, I cut a six sided star out of 3 millimeter PVC sheeting. It is hard to shape small pieces of PVC because if you are not careful it can look bad and not uniform. You need to control your cuts because of how the material goes. To counter this, I took the rasp to even it out as best as I could.

The ring was snugly put in place and superglued down to the ball before I stuck the star into place. In After that, I put a glob of friendly plastic into the small hole I drilled and pushed the star in. After that, I made some small putty like balls and stuck them right onto the prop before I painted it purple.

Since I was rushing, I tried to use fabric paint. That was the worst mistake because it gets really blotchy. I ended up sanding it all off and redoing it in acrylic. I based the silver bits with grey paint before I painted the metallic paint on. After that was done, I bought some nail jewels for the rhinestone gems and stuck those onto the heart. The last thing that needed to be done was the small detail on the small star, which I marked with a marker before I varnished the entire thing with a gloss varnish.

That explains this prop! As always, if you have any questions, please feel free to email us at finalcosplaycorps@yahoo.com! 

Saturday, January 14, 2012

Let's Make Cosplay: Golem Cosplay

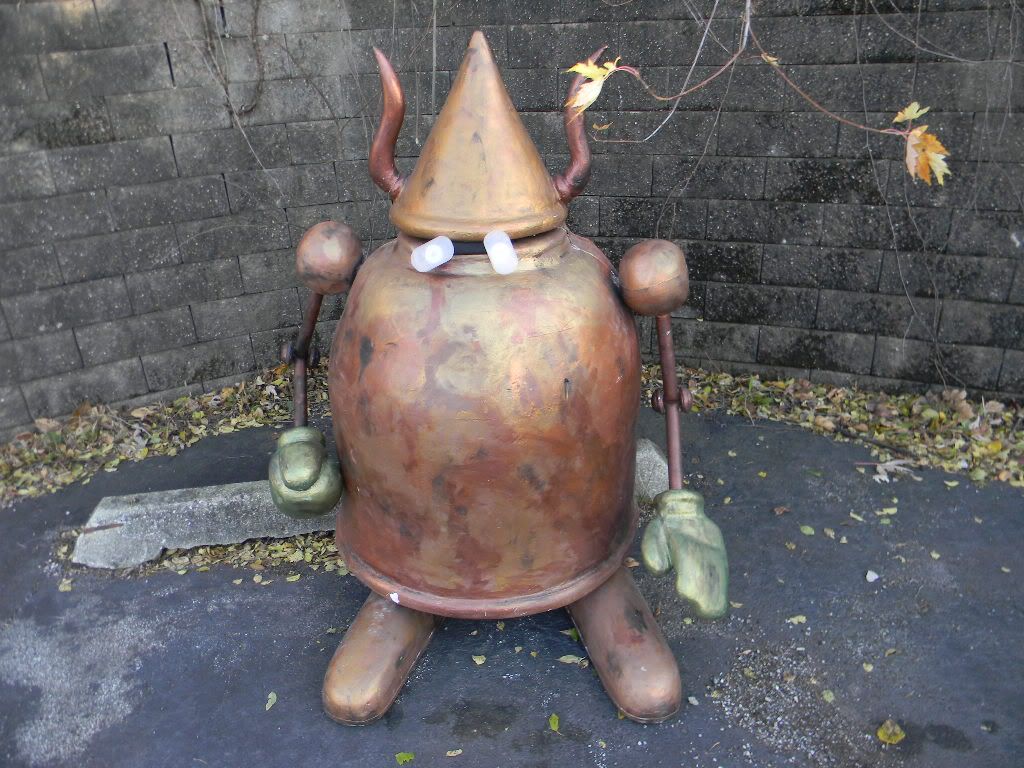
This was an interesting costume that I chose to start on four days before Youmacon. It’s from one of my favorite games, the Legend of Mana. Thankfully I already had schematics ready for this costume, The only reason that I was able to finish this cosplay in time for the con was because I had plans already in place and I knew what I wanted to do and how I wanted to execute the cosplay. If you are interested in looking at the videos corresponding to the creation of this prop, please go to the following link.

http://www.youtube.com/user/FinalCosplayCorps#p/search/0/mBQB4gftg3U This link is to the first video. The other ones following it will be in the section to the right of the video.


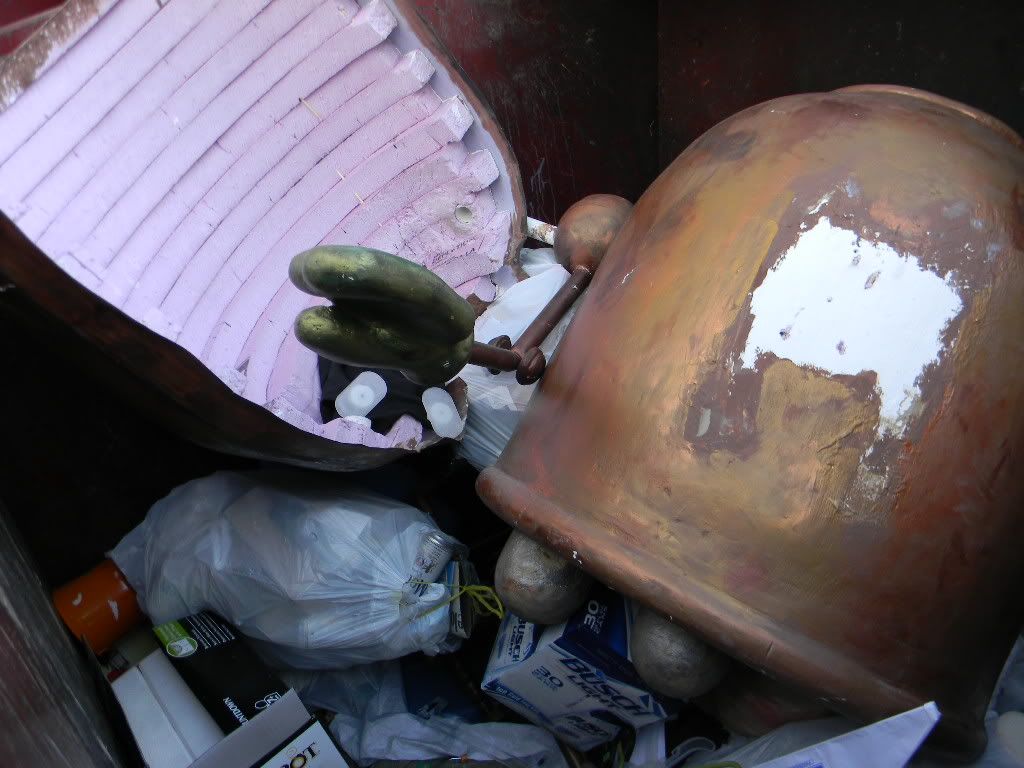
To lay the groundwork for this costume, I started with circles of foam stacked on top of each other. Think of how onion rings are stacked up when they’re brought out to you at a restaurant and you’ll get the idea. The trick with foam is to use it as effectively as you can with circles and compound tape. When you remove cavities from the foam, keep them and use that foam for other exposed sections. If you were to make a circle, you could cut a run and then stack another ring on top of the ring before it to make layers stack together.
You’ll want to start with two circles. One will need to be smaller than the other so that you can stagger then properly. Think about how you give a baby a bunch of different sized circles and then teach them to stack them into a cone shape. When you cut your circles, make sure you are CAREFUL about the THICKNESS of the circle. If you cut your circles too thin from the foam it will make one side either weaker or make it weird when gluing. If you cut it too thick it will be too hard for you to move in the actual costume. I usually say that you need a 2 inch minimum for EPS foam. If you opt to use another kind of foam you will need to mess around with what thickness will be the most ideal.

There’s a variety of ways I chose to draw my circles. If the circles are going to be relatively small, I’ll use plates. Since I needed really large circles for this prop since it was going to be going around my body, I constructed a compass. Basically, you’ll need to create an axis and then create a method to be able to pivot around that axis. I took a ruler and measured out what I wanted the diameter and the radius of the circle to be.  After I determined where I wanted the center of the circle to be and how big the radius and diameter was and marked those, I took the compass and stuck the pointy end in the foam where the center of the circle would be and took a marker and spun it around to hit all the points I made measuring out the radius from the center of the circle. If you cut out a center piece you can take that piece and use that hole for the center of the next layer so it makes the same circle every time. This is extremely important when you’re doing multiple circles. If your circles are off center you can have lots of missed spots and it becomes problematic.
Before you glue these layers together with these hard edges you will want to cut the basic shape of the prop. Instead of cutting out the big edges after you glue everything together you will have the basic shape. I like to stack the layers all together, draw where I will need to cut, then cut out the foam so it will be in the shape I need it for after it’s glued together. It’s easier to cut a two inch wedge than huge chunks of foam glued together. However, doing this can lead to some issues, so make sure you don’t cut too deeply in case something goes wrong during gluing. 

As a side note, it is not good to combine different kinds of foam. Spray foam will eat EPS foam. DO NOT try to patch holes in EPS foam with spray foam. I choose to use EPS foam because it’s way cheaper by volume. Spray foam is usually full of cavities and useless. It’s good for putting things together fast but you often lose time by filling all the holes that spray foam has. Finishing spray foam also takes  lot longer because of how coarse it is. Whatever you do, if you choose one kind of foam stick with it.

Once you had your basic shape cut out and glued together you can get a decent sanding tool and go in to start shaping. Since foam is really soft you don’t need a super hard tool. When you’re sanding you need to be careful of the layer lines. Unless you’re using  a huge block of foam you will getting stuck with sanding many layers. You’ll need to mask them as well as you can otherwise you’ll be able to see the rings when you paint. The spray adhesive is denser than the foam itself so lines can be evident even if you sand everything smoothly. You need to get the rings out later, so you don’t have to get it perfect for now. You can sand it again after you use the plaster of paris.


After that, you’ll need to start working with the PVC pipes to work in the arms. I created a PVC pipe bearing. You can easily make your own with two pieces of pipe that fit together well. You will want to cut a small piece of the 1.25 inch PVC to protect the costume. After that, cut the 1 inch PVC pipe so that it can rotate in the 1.25 inch pipe. You need to be careful with this because if you just used plain pvc pipe you could wear away the joint very easily. Even if you use plaster of paris to reinforce the joint it will still crack away over time and it won’t last very long.

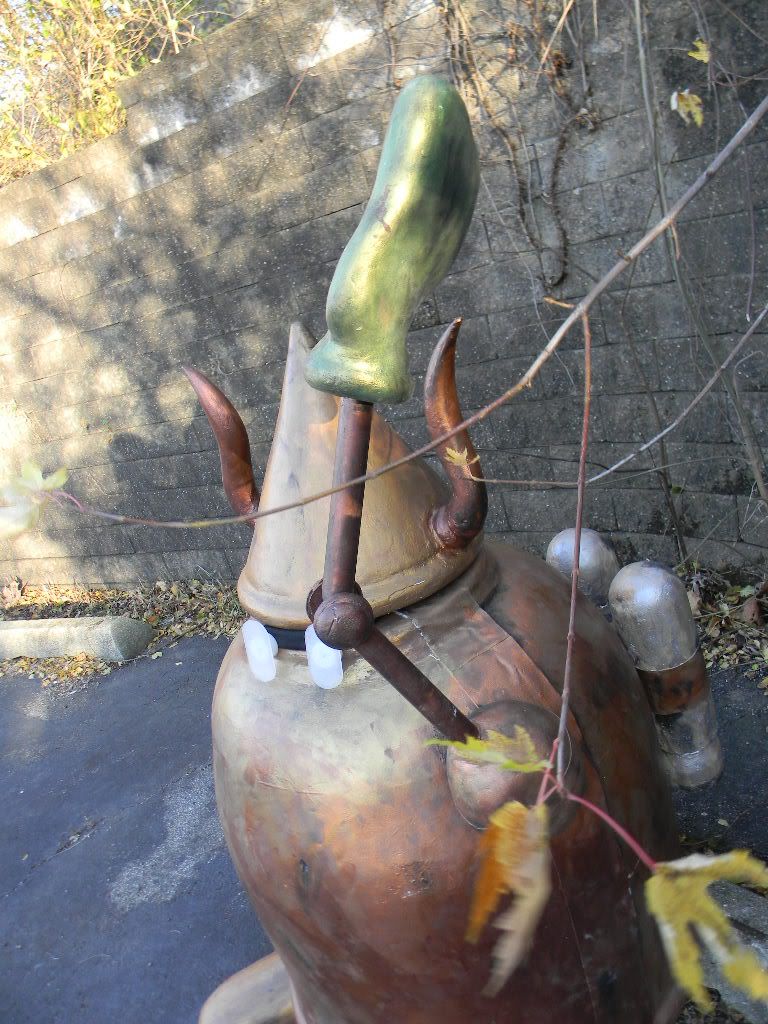
Since the cosplay allows for a lot of space I was able to make the body huge and cavernous. As such, I was able to keep my arms inside the costume and didn’t have to have them coming out of it. Since that was the case, I put in puppet arms to make the costume look more in character. It was pretty easy to do. All you need is a pipe with decorative bits with foam decorative bits and some PVC bearings. I decided that heat shaping the PVC pipe for the arms was the best because it was cheaper and was easier to do since you wouldn’t need to install a bunch of joints. For this type of bend you want to heat it evenly and completely over the entire outside surface of the pipe. You want to get it right the first time. If you have to do it multiple times you make the bend in the PVC weaker every time. Heat up the PVC and then press the inner edge in to how much you want it bent. Then you will need to wait for it to cool. The outer edge will solidify and be a bit stronger than the inside edge. If you don’t do it right, the inside will start to crack, especially if you keep on bending it in and out.

If you look at the videos, I would actually cover the feet now. However, I have chosen to finish the arms first in the blog post. In order to start with the fist, I cut the basic shape out of foam then glued the layers together like how we did the main body part. I drew the idea of what I wanted the fist to look like onto the surface of the foam with marker. Since you’re carving out something out of a block you need to envision what’s inside and slowly work your way in. The best way is to start with the most exposed parts of the glove and then keep on working in. I found that it was the best to find was the thumb and the knuckle before I started to work in other details after that very slowly, sanding and shaping the foam to get the hand that I wanted.

In order to support all the foam that was glued together to make the hand I used huge foot long shish kabab skewers to laterally link all the foam together. That way, if the glue isn’t gluing properly together, all the skewers are going to be holding it together. It provides additional support and ensures that everything will stay together. I put a shish kebab skewer every three inches. One of the hands required a curve and for that one I inserted even more skewers to make sure the prop stayed together. The hands didn’t need crossbracing. Just inserting the skewers were enough.

In order to put the fist on, you will need to create a hole to jam over the pipe. If you jam just the foam on over the pipe you will be dependent on just friction to hold the foam over the pipe. I took plaster of paris and threw it into the hole that was in the foam before I sprayed insulation 78 on the pipe and jammed it all together to make sure that it stuck and held well.

I also had to make the small elbow pieces out of foam. I screwed a PVC disk onto the elbow and then glued the foam to the PVC Disk (PVC will take screws but foam will not).  As such, I used the small PVC disk as a transfer to hold the foam in place.

Now I progressed to the feet. One of my hard rules is to make sure you wear comfortable shoes! You’ll be walking a lot in these cosplays and it does your body no good to be walking in uncomfortable shoes for long periods of time. Also, for these shoes, I needed to do some foam parts. These big foam parts are prone to snapping off if you don’t reinforce them.

To start these I made a shoe print out of wood. After that, I took a pair of my comfortable shoes and screwed the shoe into the wood at the toe and the heel. Note that if you use wood, it can be really hard to walk around on concrete, tile, or other hard surfaces since the wood is so smooth. To give the shoes some friction, I chose to layer the very bottom of the wooden shoe portion in cardboard since it is easily replaceable, cheap, and would provide some kind of friction. You can also use foamies or other soft and pliable materials for the shoe. Having friction really helps you to get around, especially if you’re walking in clunky shoes.

Note, foam doesn’t glue well to wood. To make it stronger on the foot I put wonderflex around the bottom edge of the shoe (since wonderflex sticks to most stuff). You will want to stick the wonderflex on before the plaster of paris. Wonderflex sticks better to porus surfaces and it sticks onto wood because of the grain. If you have a nicely waxed wood it won’t stick as well.

After you put on the wondrflex and the foam, you will want to use a lot of plaster of paris to cover of the shoe and to fill in the holes of the foam before you start sanding. Now you can get rid of the layer rings. You can plaster of paris the entire surface before sand down the rings that you can see so that you will be able to hide the pieces. When you’re using plaster of paris you need to store it well when you are not using it. I like keeping it in a water container. If the brush hits the air it hardens and then you need a new brush. I use my hand, brush, and a spackle tool. There are a number of ways to get it on. After you finish sanding it, you’ll want to coat it to make it stronger.

Next I progressed to the horns that jolt out from the side of the head. They are very easily broken and are very important to the costume. I had to do a lot of crossbracing in these horns to make sure that they didn’t go anywhere since they were so easily broken. The glue wasn’t going to hold well to the horns either, given how pointed and narrow they were. I used approximately 5 skewers in each horn to ensure that they weren’t going to break and worked primarily with foam because it is good at giving textures and gives a different feel to the final product.

In order to shape the foam for the horns, I opted to use a hot knives. AS A NOTE, HOT KNIVES ARE VERY DANGEROUS. BE VERY CAREFUL. A handy tool to have around for foam is a pumpkin carving tool. There are saws called foam saws and they come to a really sharp point. They allow you to puncture through the foam without killing a huge surface area. Pumpkin carving knives are smaller than foam saws and do the same thing. They are great for precision cuts and are pretty cheap, especially after Halloween.
We ran into an issue with transporting it so we cut it in half. However, cutting it straight in half would be bad for holding it together so I cut it in a zig zag pattern so there would be more surface area. In addition, I could add a skewer to the cosplay straight through the zigzags to hold it in place at the con.  

With this all being done, it was time to paint the piece. Since I only did it a few days before the convention there was no time to nitpick on details. I opted for this cosplay because it is steampunk based and the genre allows you to kind of mess around with how smooth and polished it looks. Steampunk is basically just metal all around so I chose to use a metallic paint. In order to paint with a metallic paint you will need a base. The fists were green so I started with a green base before I painted with a metallic green. I used around three bottles of brown paint to cover the main part of the cosplay before I started to work on the gold metallic color. I wanted to have a non-uniform tone so I used three different kinds of gold and copper metallic and worked them in layer by layer. While this sounds like a lot of work it really isn’t. You’ll mainly be plopping it on and mixing it with your hand to get the creases in. After you complete the metallic coating you will want to get the colors you want for oil and strategically degrade the paint job. If you have cracks in places that you want to emphasize, get a wash and cover that section in it so that it will bring out the imperfections. The flaw is built into the character of the costume.

Note, when you are painting the PVC Pipe be sure to sand it before you paint or the paint will come right of.
I also did some bits of decorative wonderflex work before I painted. You would typically put wonderflex on before plaster of paris but since it is decorative the detail has to be undamaged so it needs to go after the plaster of paris. Since it is only decorative it isn’t holding any weight so it doesn’t matter if it isn’t as strongly structured.

I totally didn’t treat this costume well at all. It needs to be repaired. For the damaged wonderflex,  I I have to do is just heat it back up and put it back on. Since it is a steampunk costume, all I did was just took dirty colors and made it part of the character. There is some thought you need to put into mud and oil. If you blotch it on it can look ok but if you put it on like how it might have happened in real life (like how oil might leak from a crack) it looks more realistic. I had layers that I sheared apart just enough to damage the paint job. To hide that you need to take a heavier paint and work it in there or else it will just look like rings.
That’s the Golem cosplay tutorial! As always, please feel free to email us at finalcosplaycorps@yahoo.com if you have any questions or check out our Youtube at  http://www.youtube.com/user/FinalCosplayCorps

Wednesday, November 30, 2011

Let's Make Cosplay: Mini Post: Specialty Edges for Blades

This is a mini blog post where I wanted to talk about how you could create a specialty edge on a blade. This is an extension off of the sheathed sword blog post and in this post I’ll walk you through how to do a wavy edge on a blade with aluminum tape.

This is tricky because you need a light tape so that it doesn’t rip the aluminum tape. Painter’s tape sticks too much and would be too hard to remove. Tape like masking tape, which doesn’t have as much adhesive, would be ideal.

What you should do is attach this tape to the blade’s edge and then draw out whatever wavy edge design that you want to have on the blade. Use an exacto knife and run it along the wavy lines you drew carefully so that you can pull off a piece to expose the first edge. Sand that one way. After you sand it, put the tape back over that section and peel off the tape from the other section. Sand that in a direction different to how you sanded the first section and you’ve got a specialty edge! 

Let's Make Cosplay: Sheathed Sword


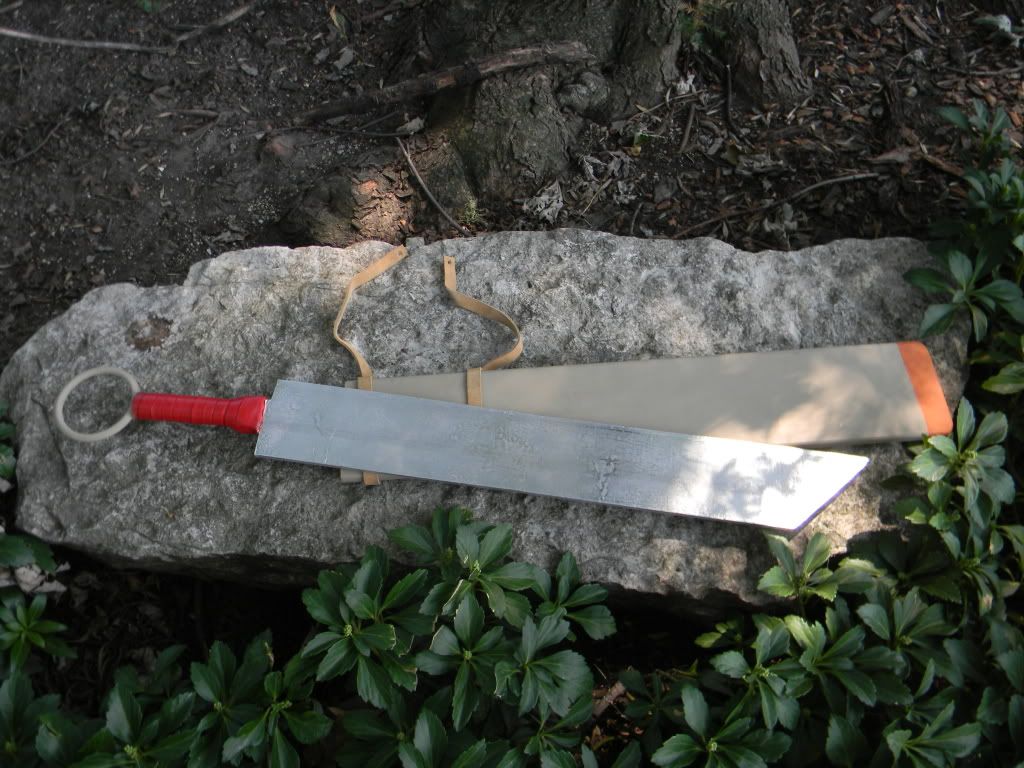
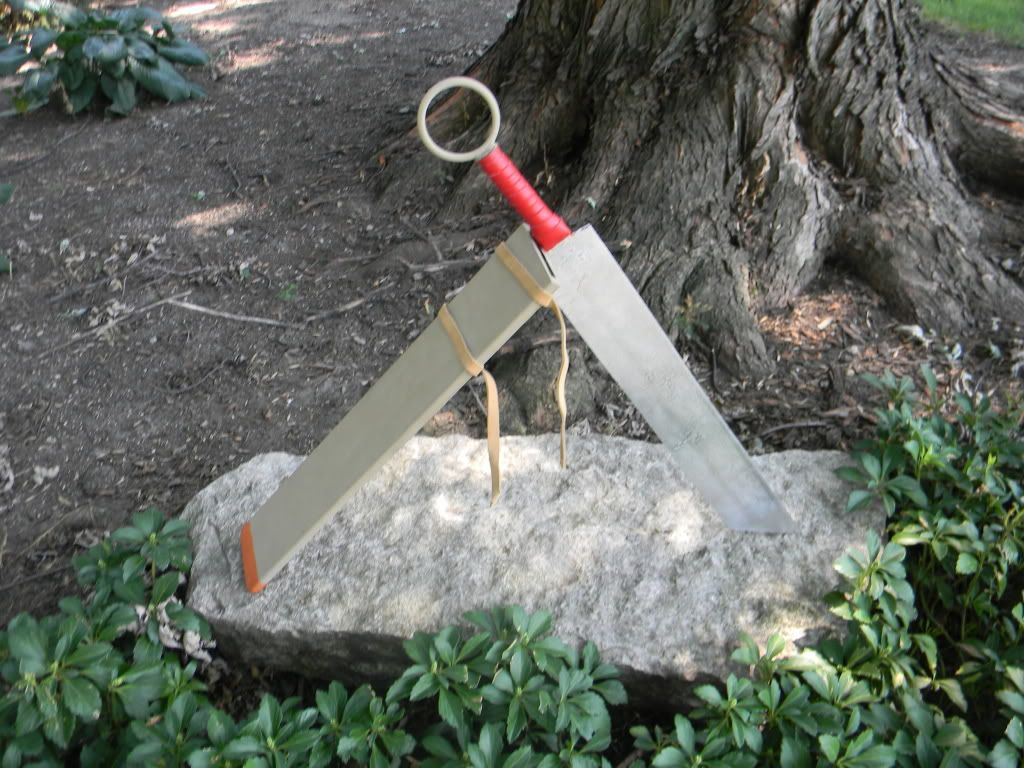
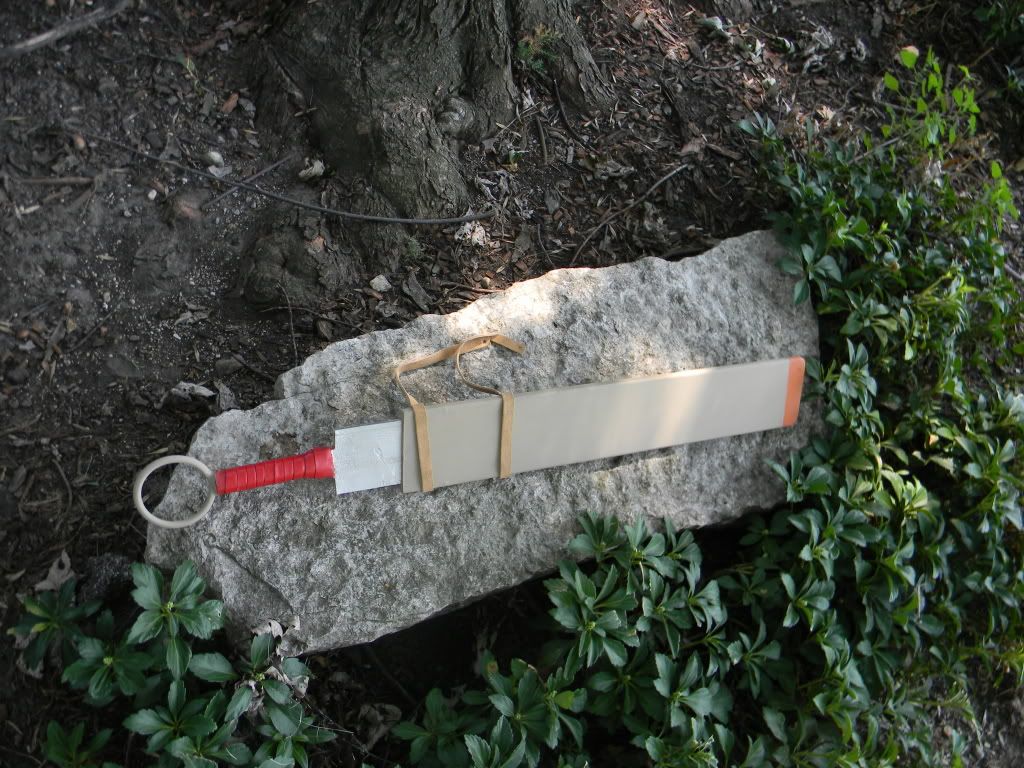
The sheathed sword prop was a prop that was a Youtube watcher suggested. It was a really interesting prop that I wanted to make so I chose to create it and gift it to the viewer, especially because I wanted to create a set of videos that also covered how to make a sheath that would comfortably hold a sword properly without denting the tip of the blade (which is a common problem with many sheathes). Most sheathes have a flat bottom and causes the tip of the blade to wedge flat onto the bottom which damages the tip. Interested in seeing how this prop was made? Check out our videos at http://www.youtube.com/user/FinalCosplayCorps/search?query=sheathed+sword

The materials I used were as follows: lambent flooring, 1/8 inch medium density fiber board (MDF), #4 half inch Philips flat head wood screws, 1/2 inch PCV pipe, 1/2 inch wood dowel rod, aluminum tape, a wood ring, friendly plastic, poster board, white glue, cement glue, red pleather, and acrylic paint (tan,gold and mango colors).

The tools that I used were as follows: a hand saw, an exacto knife, a heat gun, a yanky push drill, a Philips screwdriver, a rasp, a file, a pair of scissors, some sponge brushes, a 80 and 150 grit sanding sponge, a fine tip marker, and some rulers.

Before we start I want to cover some issues with aluminum coating. Before you coat anything in aluminum coating you need to make sure you start with a firm and ridged material. Aluminum coating wrinkles really easily. If you start with a flexible or flimsy material the sword will bend and the coating will wrinkle. In order to combat that the sword needs to be strong, firm, and sturdy so it doesn’t bend and the sheath also protects the sword and keeps the sword straight while it’s sheathed so it bends less and thus lasts longer.


In order to make the sheath you will want to cut it out of the same wood as the blade and at the same size so that it will fit snugly. After that, the other portions of the sheath can be made out of whatever wood you want. I made the sheath with three layers. There is a top layer, the middle layer, and the inside layer. The middle layer of the sides of the sheath are the wood that is made from the same material as the blade. I glued some poster board to give some more wiggle room on the inside of the sheath so it would help protect the blade. You need to be able to gauge the friction that will happen when pulling the sword out of the sheath or sliding it back in and the poster board helps decrease the friction.

After I get all those portions cut out (the sides and the insert at the bottom of the sheath to protect the bottom of the blade) and the poster board glued in I took a wood planer and rounded the edges of the sheath, making sure that everything lined up before I finished rounding the edges of the sword and sheath. If you find any holes in the sheath after you’re done rounding off edges and you put the sheath together you can use friendly plastic to fill them.

After you’re done with that portion of the sheath you can move to the handle of the blade. I chose to use a piece of ½ inch pvc pipe. I cut a slit down one side of it so that I could heat up the pipe and wrap it around the nub I made on the blade to insert it into the handle. You can heat up the pipe with a heat gun. After you’re done wrapping the PVC over the nub you need to put screws through the PVC and into the nub potion to keep the handle firmly onto the sword. You’ll want to do 4 to 6 screws (2-3 on each side of the handle). If your sword weighs more, you’ll want to put in more screws for support.

In order to make the ring portion of the handle I decided to take a wood ring. The problem with using wood is that you always have to be careful in regards to the grain. If you screw against the grain in the wood it will cause the wood to splinter. Since wood rings have grains that go in every direction it is impossible to put in a screw in a wooden ring because it would splinter. Since I couldn’t screw it in to mount the ring into the handle I chose to use friendly plastic because it is extremely hard and durable after it’s dried. I put a small slit in the ring so that it would mount a little better to the PVC pipe before I globbed on friendly plastic to make sure that the ring sticks extremely well and firmly to the PVC handle. Friendly plastic sticks quite well to things that are rough in texture and this helped to anchor the ring and the PVC together.

After the friendly plastic dried and fully hardened I took some red pleather and began to wrap it around the handle. I mounted the pleather to the PVC pipe with a screw before I glued around it to make sure that it stayed firmly and didn’t get pulled off. After that, you need to wrap up the handle, overlapping the pleather halfway over the piece before it so you get a thick double layer grip and a nice crease. After you wrap it fully from the top of the handle to the bottom you need to put a screw in the other end through the pleather and into the PVC. Make sure the wrapping around the PVC pipe is tight so that it doesn’t slip so that you lose your grip.

After you’ve got these parts all assembled and ready to go you can get ready to paint. You should sand all the edges of the sheath to make sure that all of them are smooth and you should also lightly sand the ring so that it will take well to the pain and not have weird textures across the wood.

Since there are holes where screws are on the sheath I used friendly plastic to hide the holes.
As a note, I choose to use friendly plastic as a patcher because I use my heat gun for a lot of crafting and the friendly plastic works well with that. It’s not an end all patcher. You could also use resin. I just prefer friendly plastic because it’s more convenient for me.

To start painting, you will need to put a base coat on the prop of whatever color you want the prop to be.  With dark gold I use a brown base coat. If it’s a light gold I use a tan or a grey depending on what color the gold is. Metallic paints don’t take to whatever you’re painting the first time so you need a base coat. The primer you choose changes up how the metallic color will show later.

After you paint and varnish the sword and sheath it’s time to bring out the aluminum tape. For this, patience is the most necessary thing you need. You have to be VERY careful because this material is VERY easy to wrinkle or to misalign. Also, if you don’t have a big piece of aluminum tape to cover an area, take advantage of existing lines and edges to hide the creases. You’ll need about one foot wide aluminum facing tape. Contact paper brushed nickel also exists so you could use that as an alternative. Note, you don’t want to layer aluminum tape over itself because you can see the edges come through and it look like cracks. Also, make sure that you use a very stable and unmoving material as a base.

While you’re attaching the aluminum tape you need to peel away the adhesive protection slowly and work with it. Take a straightedge (I used a putty tool) to push it down. As you go make sure there are no air bubbles or cracks. Get it done. At some point you might have to layer over a piece of aluminum. Try to get it to stick as little as possible over the edge. Cut the edge with the exacto knife to pull the piece of aluminum tape away and you have a clean edge from piece to piece with no overlap.

The trick to making it look realistic is to sand it. For this, you’ll need some sanding sponges. You’ll want a rougher sanding sponge for the side of the blade that needs to look like it is being used. Just use it a little bit to give some direction and nick so that it looks like it’s being sanded against a stone. Use a lighter sanding sponge for the side that isn’t being used to remove the shine.

If you want to bring out the grooves you can also go in with a wash to bring out the scratches that you put in with the #35 sanding sponge and it will create more detail work. If you do it right you’ll have enough grit to distinguish it from the sword without it looking super old.


That’s the tutorial for this weapon! I did have some tips about how you could do a custom specialty edge on your blade and we’ll have that up in another blog post following this one titled specialty blade edges. As always, if you have any questions please check out our youtube or email us at finalcosplaycorps@yahoo.com! 

Saturday, September 3, 2011

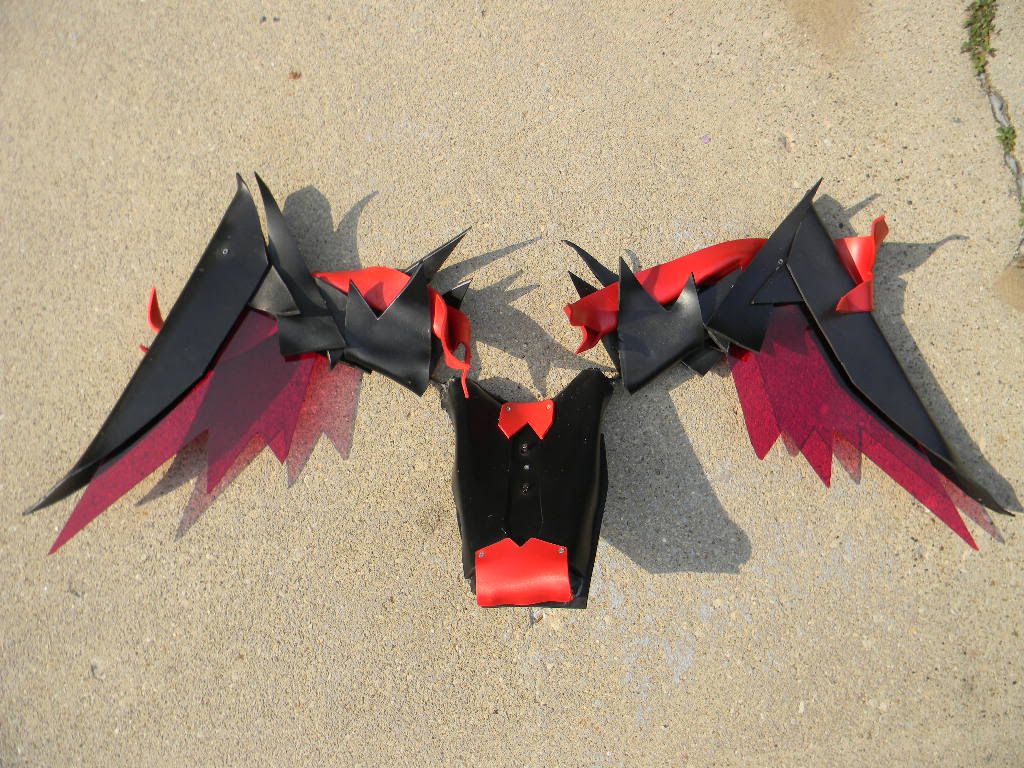
Lets Make Cosplay: Mecha Chibi Wings


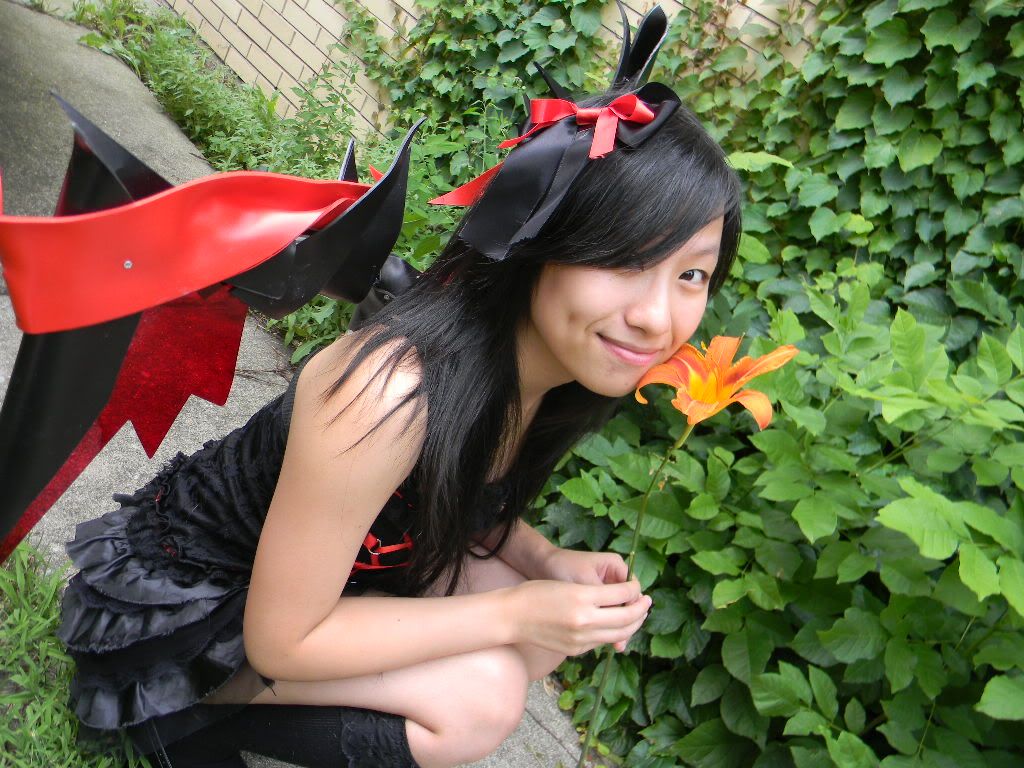
Hey guys! This is the blog post containing the instructions for Mecha Chibi Wings! A viewer asked for this tutorial but she’s a teeny tiny Asian girl so big mech wings won’t work for her. Chibi wings are much more reasonable for a girl her size to carry and wear around as part of a cosplay. If you're interested in looking at the videos which have more details about how to make this fabulous prop, please check out the videos on Youtube at http://www.youtube.com/user/FinalCosplayCorps/search?query=mecha+chibi+wings

The first thing you want to do before you start building any project is to make a preliminary plan or schematic. I recommend you try to make a plan or schematic for a few reasons.


1.       You can use a schematic to estimate the cost of the project by planning out what materials you are going to use, how much of it you will need to buy, and any equipment you may need. It allows for you to start a rough budget what you’re going to do, which is always good when your checkbook is feeling a pinch! I always price my things on the back of the schematic to see how much my project will roughly cost me. As a side note to budget management, the key is to not do a lot of big projects frequently. I have a huge mech project like once a year or a big project that’s like $600. That’s bad as a huge chunk but not as bad if I break it down into small payments over the course of the year.
2.      Creating a schematic also allows you to plan out how you’re going to create the prop so that you’ve got a guide on how you’re going to do it and you aren’t fumbling around as you make the prop. This way you can try to foresee some problems that might occur and adjust for them ahead of time so you don’t waste materials (and money) later on.
3.       A schematic also gives you an estimated weight and look of the final project.

Alright, so before we get started you’ll need your tools and materials. For this project we needed the following materials. You need 3mm. PVC sheeting in red, white, and black colors. You will also need 3mm. transparent red acrylic sheeting, IPS Weld on #3, a 2 mm. carbon fiber rod, two push release key rings, some medium density fiber board (MDF), #4 half in, some Philips flat head wood screws, marine power PC 11, and some black and red acrylic paint. The tools you will need include a hand saw, heat gun, yanky push drill, Philips screwdriver, pliers, rasp, file, sponge brushes, 80 grit sanding sponge, fine tip marker, and rulers.

The first thing that we want to make is a back support.

Having a back support piece is crucial because it allows the weight of the prop to spread across your entire back so you aren’t putting the entire strain on your shoulders. If you watched the video you can see what kind of shape I cut out and how I molded  it to my body so that the weight isn’t all on my shoulders. This kind of back support spreads the weight evenly across my entire back and it is heat formed to fit my body so it’s nice and comfortable.  Having this kind of a back support is so much nicer than having to put all the weight just on my hips, shoulders, or my back.

With that being said, the first thing that were going to do for our chibi wings is make the back support. Since we are making heavy ones and not your typical feather wings, you will need a plate to steady the wings so they don’t flop everywhere. You will also want something to harness the wings to (like a bra).

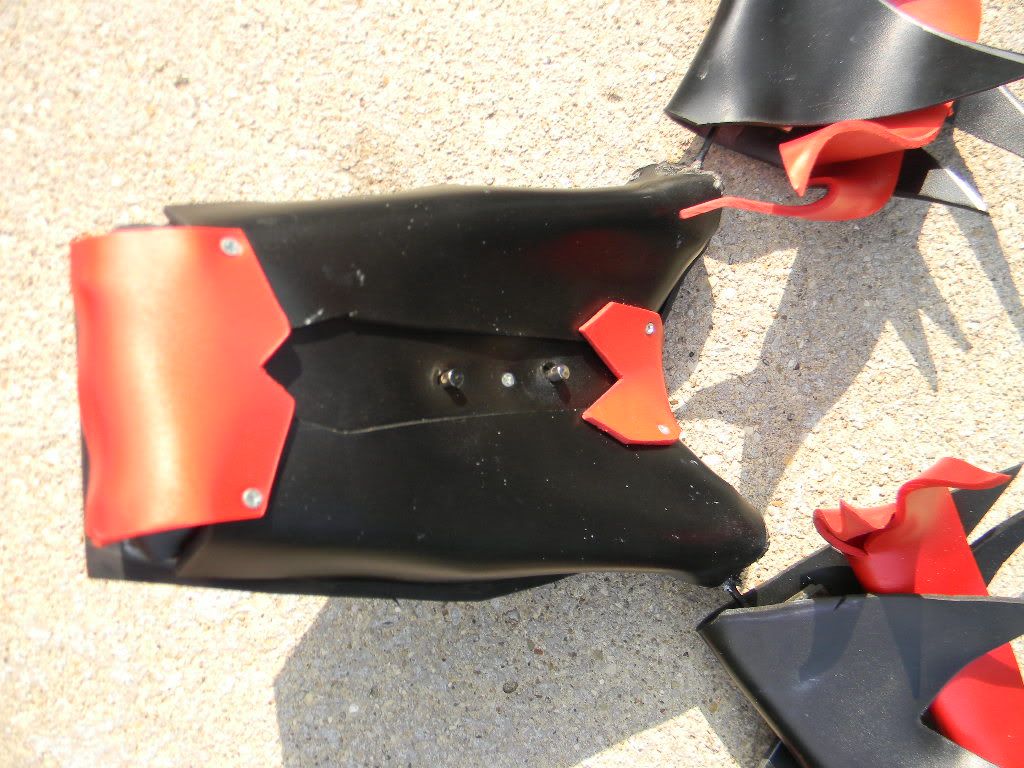
We’ll start off with a piece of PVC. The reason we choose to use pvc is because it is thermaformable. For her, I want this to be 8 inches by 4 inches. I cut out two separate plates. One of the plates is going to attach to the bra later on and another one of the pieces will attach to the wings themselves as the main support.

If you look at the first video you will see what kind of shape I chose to cut out.  You will need two of these pieces cut out. The reason for this second piece is so that it will support the wings on your back to make sure that they don’t flop over.

After you’ve figured out how big you need it cut to fit yourself you can cut on the plastic. If you’ve never cut plastic before I have posted a tutorial online for that and you can check it out (NEED LINK). As you cut, be aware of the angles that you are cutting. Some of these angles may be very small and it will be harder to cut from that side. Cut from the side with the widest part that needs to be cut and move to the smaller angle.

Now that you have both your parts cut out, we need to punch some holes in so that we can create supports on the side so that these wings will stay even and not sag in one direction. In order to do this we’re going to drill some small holes. The more holes that you put in means the more support this piece will get since the weight will be distributed over a large area. I’ve decided to put nine holes on each side.

Now guys, this is super important. When you drill these holes make sure that these holes are ¼ inch apart. If you put them more apart then you put extra pressure on the thread you will handstitch in later. If you put the holes closer together the thread can saw its way through the plastic over time.

So now you’ve got two plates cut to fit you with the holes punched in. Time for your next step. Pick one of the two pieces as the one you want to strap to the bra. This will be what pushes against your body and supports the rest of the piece. Now make sure that you file down all the corners. The last thing you want is for some sharp and pointy corner to be digging into your back.

After you file all the corners and make sure they’re rounded off you’ll want to get the heat gun. We’re going to use that gun to shape the support so that it molds to your back. You’re going to want to roll the edges up a little bit so that they don’t push into your skin. This piece will be under whatever costume she’s wearing. The other piece will be on the wings itself and doesn’t pose as big a problem. This piece that we’re working on now ensures that she can put the wings on or take them off without taking off her shirt. Mark this piece with an X so you make sure that you don’t confuse the two pieces.

So we need to have these lock together. The piece that you want to be directly on your skin on your back will be worn underneath your shirt and the piece that connects to the wings directly will be on the outside.  We need to have these lock together quickly and easily. For this she will need to put a buttonhole on the back of her shirt or have a shirt that buttons up in the back. The bra will support  the wings. Hopefully we will make these wings as light as possible and we won’t put too many elements into this.

So here we’ve got two small rings and two small clasps. These are going to be used to lock our wings to the support. We want two of them to make sure that the wings don’t pivot. What we need to do is insert the clasp into one piece and we want to insert the two rings into the other piece.

So how do we get these rings onto the PVC? Well, we are going to start out by drilling a hole smaller than the ring itself. We will need to make a hole in the middle. You will need to make sure that the tool you are using will drill a hole smaller than the ring. Carefully push a hole into the middle of both pieces of the back support.

After you’ve pushed your hole in, pick up your heat gun and heat the PVC. Be careful to make sure that the plastic doesn’t bent its shape. We want it soft enough that it will be easy to fit the ring in. Go ahead and poke the ring into the hole. The ring has small lips and we want to make sure the PVC wraps around those edges.

Now we’re going to put the clasp into the other piece. This one we want to mark because we have to make sure the clasp and the ring line up are even. If they don’t line up the prop will be unbalanced and structurally weaker. After you mark your hole, drill into it again. Keep in mind that these fittings need to be really snug. If they aren’t the props won’t hold properly and they won’t be as structurally sound. This side we have to make sure we know what side we’re putting the clasp in. The other one didn’t matter as much because the ring is the same on both sides. Since the clasp has buttons on one side that lock onto the lip of the rings we need to make sure that we insert the clasp so that the buttons will match on the right side to push the panel with the support.

As a note, all of you can likely see that there’s a small gap between the two panels. That is to allow for her shirt to sit in between the two panels. Don’t worry about that. The wings will stay stable as long as we put two rings and clips.

Now it’s time to start the actual wing parts. I chose to go with matte colored PVC because it is easier to work with. Acrylic is nicer and more pricy but I use different tools for that so to keep it simple for this prop I chose to go with the matte.

Draw your wing frame shape out first. After you draw this out you can begin sawing out the pieces from the PVC. MAKE SURE that you keep things small when using acrylic vinyl. PVC sheeting is fragile so try to keep them small to reduce the risk of damage. I chose to use MDF for the base of the wing frame. Since this is just the frame it doesn’t need to be thermoformed or altered. It just needs to be cut. This material is stronger and cheaper so it’s good to use.

As you see at 4:40 in the 3rd video of the series, located at http://www.youtube.com/user/FinalCosplayCorps#p/search/10/Bpr5V0srvlM you can see that I chose to use more of an L shape. This will be how the wings stick out from the back. I will have two pieces of this cut with one piece of acrylic in the middle and I will put as many screws through these pieces in the middle as I can so that it will hold in place without breaking.

Since you need one for each side you will need to cut a total of four L pieces of the first PVC and two L pieces with the acrylic. This way you have two pieces of regular PVC and one piece of acrylic for each side. After you cut all your pieces we will need to put the screws in.

To make sure that the wings can have a little bit of spring we will have to make sure that we don’t mount them directly to the center piece. To do this we will mount them using an acrylic rod. The rod I chose to use was a 2 millimeter rod. It’s thin but it’s still really strong. I’d suggest using carbon fiber rod. It’s pretty expensive so I’d recommend just getting what you need (any specific amount). DO NOTE: One problem that you will have is combining the materials. I don’t have the really strong cement stuff that you’re supposed to use but for now I’m going to put it into the center piece.

In order to get this rod in I need to drill a hole big enough to thread the rod through. You will want to put this hole about two inches in from the end of the wing frame. After you drill the hole you will heat up the carbon fiber rod and set it between both frames before you bend it so that both ends are parallel with the frames and they stabilize the wings to the support. After you attach the wings that way we need to make supports to make sure that the wings won’t snap off. I chose to make a triangular section out of MDF right underneath each wing so that it would help prop the wings up.

After you’ve got the base done you’ll need to pull out your colored PVC. Cut your pieces to how you want them to look for each wing. We will be screwing the PVC into the support before we use the heat gun to thermaform the plastic. Notice that we’ll be layering all the PVC strategically so that each upper layer covers over the screws underneath it.

When you heat this plastic you need to make sure the gun is always moving and that the light is just on one part you get hot and cold zones . You can warp the plastic or burn it if you don’t do this correctly. Also, you need to be very careful when dealing with acrylic PVC. It’s super fragile but can be thermoformed. However, it melts at a much lower temperature so be careful when you use it.

The girl who suggested this prop ended up getting thick bindings to use. She picked up bindings similar to the ones that are used on backpacks and that is how she added additional support in addition to the back support.


There we go! Chibi Mecha Wings! If you have any questions please feel free to ask! 

Welcome to the Final Cosplay Corps Blog!

Why hello there! 

You have reached the blog site for the Final Cosplay Corps! It is likely that you have come here to look up more information about us and what we do and we would like to take a moment to thank you for visiting! We love giving out advice for cosplay help and we always love having visitors! 

If you haven't already checked out our Youtube channel please feel free to go and look at some of the great tutorial videos that Chris Farabaugh (millions_knives) has already put up there! The url is http://www.youtube.com/user/FinalCosplayCorps . We are currently working on getting blog posts up for each project and once we get all the backlog up we'll consistently keep posting up new blogs with information from the videos! 

If you have any questions for us at all, please feel free to post here, contact us on Facebook (Final Cosplay Corps), contact us on Youtube, or email us at finalcosplaycorps@yahoo.com!