Tuesday, December 20, 2011

Let's Make Cosplay: Lightweight Horns for Head


In this tutorial I will cover how to make a set of lightweight horns for your head. When making horns for your head you want to make sure they are light. If you make heavy horns for your head it will drag on your head and put pressure on your neck and spine. They can also fall off and move around, which is less than ideal. Making them lighter will make it easier to mount, and for horns like these you will want them mounted fairly well. 

I chose to use the following materials: EPS foam, shish-kabob skewers, plaster of paris, gesso, wonderflex, yellow and papaya acrylic paint, head band, cement glue, and varnish.
  
I used the following tools: hand saw, wasp, paint brush, sponge brush, 60 and 180 sanding sponge, and yanky push drill. 

To begin with, I opted to use a headband to stabilize the horns. They would provide the best method of securing and stabilizing the long horns to your head. DO NOT use spirit gum or prosthetic adhesive. Those kind of materials are dangerous to use with horns that are as big as the ones we are making in this tutorial because they can damage your skin when they fall off and they won’t last that long. It’s best and easier to use a headband. Many artists chose to use prosthetic glue to fasten the horns onto their heads because they see actors use it for their props. However, actors don’t wear horns for extended periods of time and prosthetic glue is not a good idea if you want to use it to keep your horns on all day long during a convention. The easiest way to do this is to put a headband underneath the wig and attach the horns to the headband through the wig.

To start the prop I decided to begin with foam. Take your saw and you can begin to cut the basic shape out of the foam with the saw. After you cut the basic shape you can use the rasp to give it a basic round form. Since foam needs to be smoothed out I chose to use a rough sanding sponge (60) to smooth out the foam and to get the large pink pieces out of the horns.

Once you’re done shaping and smoothing your horns out of the foam you will want to reinforce the horns internally so that they have more rigidity and stability. I took skewers and pushed them into the horns so they would be more stable. I also used the skewers to mount the horns to the headband by drilling holes into the headband and then gluing them into place. After that, you will need to take some wonderflex and use it to cover over the foam. This will act as a coating over the foam because you will need to cover the horns with some plaster of paris. The plaster of paris will peel off the foam so the wonderflex will act as a base for the plaster of paris to stick to. Apply the wonderflex to the skewer portion in the headband as well.

However, as you put the wonderflex around the side of the horns you need to be careful so they don’t show around the side of the horns. In order to make sure the wonderflex doesn’t mold in an odd way around the edge of the horns I chose to stop the wonderflex about an inch or so above the end of the horn. This way, the edge would not fold funny and it would be hidden with the wig.

Now it’s time to coat the horns in plaster of paris. I chose to start with a plaster of paris mix mixed with water because this creates a smoother application. I also expected that the horns wouldn’t be worn for long lengths of time, given that the horns were much bigger than the six inch rule that most conventions have in place. After the plaster of paris fully dried, I took a sanding sponge and sanded down the plaster of paris to go with the brush strokes that I would use when I painted the horns. Then, I opted to use a traditional brush instead of a sponge brush to give the horns stream marks from the tip to the base so that they looked like horns.

Now, I’ve noticed that most people choose to paint the horns in yellow, orange, and red. However, these aren’t the correct colors. The colors tends to be a medium color between yellow and orange, which tends to be a difficult color to paint since you need a really dense pigment paint to paint yellow. Artist paints are usually the best pigmented paint but it is usually  extremely expensive. You’ll need to put in multiple layers. I opted to coat three thin layers of yellow on the entire horn as a base coat. Once I was happy with the color I mixed a papaya orange (which is a red orange ish color) with yellow to get the medium color I was looking for. In order to get a straight, crisp line, get some painters tape and wrap it around the section that you want to protect from paint. Start on top of the painter’s tape and brush away from it to get a nice line. I did two more layers of the mixed color paint over the initial coat and then did the same thing with the straight papaya paint on the last section of the horns.

These horns ended up light and durable enough that the headband wasn’t needed. The person I made these for ended up reshaping the wonderflex at the base of the horns into a bunch of tabs before he punched some holes into it so that he could sew the horns into the wefts of the wig. He painted the tabs and the bottom of the horns black before he varnished it with three layers of glossy varnish.
That’s our tutorial on these fun horns! If you have any questions, please feel free to check us out on Facebook or email us at finalcosplaycorps@yahoo.com!

Wednesday, November 30, 2011

Let's Make Cosplay: Mini Post: Specialty Edges for Blades

This is a mini blog post where I wanted to talk about how you could create a specialty edge on a blade. This is an extension off of the sheathed sword blog post and in this post I’ll walk you through how to do a wavy edge on a blade with aluminum tape.

This is tricky because you need a light tape so that it doesn’t rip the aluminum tape. Painter’s tape sticks too much and would be too hard to remove. Tape like masking tape, which doesn’t have as much adhesive, would be ideal.

What you should do is attach this tape to the blade’s edge and then draw out whatever wavy edge design that you want to have on the blade. Use an exacto knife and run it along the wavy lines you drew carefully so that you can pull off a piece to expose the first edge. Sand that one way. After you sand it, put the tape back over that section and peel off the tape from the other section. Sand that in a direction different to how you sanded the first section and you’ve got a specialty edge! 

Let's Make Cosplay: Sheathed Sword


The sheathed sword prop was a prop that was a Youtube watcher suggested. It was a really interesting prop that I wanted to make so I chose to create it and gift it to the viewer, especially because I wanted to create a set of videos that also covered how to make a sheath that would comfortably hold a sword properly without denting the tip of the blade (which is a common problem with many sheathes). Most sheathes have a flat bottom and causes the tip of the blade to wedge flat onto the bottom which damages the tip. Interested in seeing how this prop was made? Check out our videos at http://www.youtube.com/user/FinalCosplayCorps/search?query=sheathed+sword

The materials I used were as follows: lambent flooring, 1/8 inch medium density fiber board (MDF), #4 half inch Philips flat head wood screws, 1/2 inch PCV pipe, 1/2 inch wood dowel rod, aluminum tape, a wood ring, friendly plastic, poster board, white glue, cement glue, red pleather, and acrylic paint (tan,gold and mango colors).

The tools that I used were as follows: a hand saw, an exacto knife, a heat gun, a yanky push drill, a Philips screwdriver, a rasp, a file, a pair of scissors, some sponge brushes, a 80 and 150 grit sanding sponge, a fine tip marker, and some rulers.

Before we start I want to cover some issues with aluminum coating. Before you coat anything in aluminum coating you need to make sure you start with a firm and ridged material. Aluminum coating wrinkles really easily. If you start with a flexible or flimsy material the sword will bend and the coating will wrinkle. In order to combat that the sword needs to be strong, firm, and sturdy so it doesn’t bend and the sheath also protects the sword and keeps the sword straight while it’s sheathed so it bends less and thus lasts longer.


In order to make the sheath you will want to cut it out of the same wood as the blade and at the same size so that it will fit snugly. After that, the other portions of the sheath can be made out of whatever wood you want. I made the sheath with three layers. There is a top layer, the middle layer, and the inside layer. The middle layer of the sides of the sheath are the wood that is made from the same material as the blade. I glued some poster board to give some more wiggle room on the inside of the sheath so it would help protect the blade. You need to be able to gauge the friction that will happen when pulling the sword out of the sheath or sliding it back in and the poster board helps decrease the friction.

After I get all those portions cut out (the sides and the insert at the bottom of the sheath to protect the bottom of the blade) and the poster board glued in I took a wood planer and rounded the edges of the sheath, making sure that everything lined up before I finished rounding the edges of the sword and sheath. If you find any holes in the sheath after you’re done rounding off edges and you put the sheath together you can use friendly plastic to fill them.

After you’re done with that portion of the sheath you can move to the handle of the blade. I chose to use a piece of ½ inch pvc pipe. I cut a slit down one side of it so that I could heat up the pipe and wrap it around the nub I made on the blade to insert it into the handle. You can heat up the pipe with a heat gun. After you’re done wrapping the PVC over the nub you need to put screws through the PVC and into the nub potion to keep the handle firmly onto the sword. You’ll want to do 4 to 6 screws (2-3 on each side of the handle). If your sword weighs more, you’ll want to put in more screws for support.

In order to make the ring portion of the handle I decided to take a wood ring. The problem with using wood is that you always have to be careful in regards to the grain. If you screw against the grain in the wood it will cause the wood to splinter. Since wood rings have grains that go in every direction it is impossible to put in a screw in a wooden ring because it would splinter. Since I couldn’t screw it in to mount the ring into the handle I chose to use friendly plastic because it is extremely hard and durable after it’s dried. I put a small slit in the ring so that it would mount a little better to the PVC pipe before I globbed on friendly plastic to make sure that the ring sticks extremely well and firmly to the PVC handle. Friendly plastic sticks quite well to things that are rough in texture and this helped to anchor the ring and the PVC together.

After the friendly plastic dried and fully hardened I took some red pleather and began to wrap it around the handle. I mounted the pleather to the PVC pipe with a screw before I glued around it to make sure that it stayed firmly and didn’t get pulled off. After that, you need to wrap up the handle, overlapping the pleather halfway over the piece before it so you get a thick double layer grip and a nice crease. After you wrap it fully from the top of the handle to the bottom you need to put a screw in the other end through the pleather and into the PVC. Make sure the wrapping around the PVC pipe is tight so that it doesn’t slip so that you lose your grip.

After you’ve got these parts all assembled and ready to go you can get ready to paint. You should sand all the edges of the sheath to make sure that all of them are smooth and you should also lightly sand the ring so that it will take well to the pain and not have weird textures across the wood.

Since there are holes where screws are on the sheath I used friendly plastic to hide the holes.
As a note, I choose to use friendly plastic as a patcher because I use my heat gun for a lot of crafting and the friendly plastic works well with that. It’s not an end all patcher. You could also use resin. I just prefer friendly plastic because it’s more convenient for me.

To start painting, you will need to put a base coat on the prop of whatever color you want the prop to be.  With dark gold I use a brown base coat. If it’s a light gold I use a tan or a grey depending on what color the gold is. Metallic paints don’t take to whatever you’re painting the first time so you need a base coat. The primer you choose changes up how the metallic color will show later.

After you paint and varnish the sword and sheath it’s time to bring out the aluminum tape. For this, patience is the most necessary thing you need. You have to be VERY careful because this material is VERY easy to wrinkle or to misalign. Also, if you don’t have a big piece of aluminum tape to cover an area, take advantage of existing lines and edges to hide the creases. You’ll need about one foot wide aluminum facing tape. Contact paper brushed nickel also exists so you could use that as an alternative. Note, you don’t want to layer aluminum tape over itself because you can see the edges come through and it look like cracks. Also, make sure that you use a very stable and unmoving material as a base.

While you’re attaching the aluminum tape you need to peel away the adhesive protection slowly and work with it. Take a straightedge (I used a putty tool) to push it down. As you go make sure there are no air bubbles or cracks. Get it done. At some point you might have to layer over a piece of aluminum. Try to get it to stick as little as possible over the edge. Cut the edge with the exacto knife to pull the piece of aluminum tape away and you have a clean edge from piece to piece with no overlap.

The trick to making it look realistic is to sand it. For this, you’ll need some sanding sponges. You’ll want a rougher sanding sponge for the side of the blade that needs to look like it is being used. Just use it a little bit to give some direction and nick so that it looks like it’s being sanded against a stone. Use a lighter sanding sponge for the side that isn’t being used to remove the shine.

If you want to bring out the grooves you can also go in with a wash to bring out the scratches that you put in with the #35 sanding sponge and it will create more detail work. If you do it right you’ll have enough grit to distinguish it from the sword without it looking super old.


That’s the tutorial for this weapon! I did have some tips about how you could do a custom specialty edge on your blade and we’ll have that up in another blog post following this one titled specialty blade edges. As always, if you have any questions please check out our youtube or email us at finalcosplaycorps@yahoo.com

Monday, November 21, 2011

Mini Post: Technique: Base Painting

Base painting is EXTREMELY important when you go to paint a prop. Coating a prop with a base coat of paint ensures that later layers will stay on the prop and that it all paints evenly. It also smooths out the surfaces and makes sure the paint will go on more evenly. It is a good idea to coat with a base color similar to the color the prop will be. However, altering the color of the base coat will alter the color of the top coat overall.

Do note: you ALWAYS need to make a base coat for metallic paints. :)

Mini Post: Technique: Dry Brushing

Dry brushing is a nice way to put on some detail onto a prop. They can give an allusion of lines or shadows. The key to dry brushing is that you take as much paint off the brush as possible. Brush specific areas and then go into deeper areas to pound the pigment in. You should stay with blacks or dark browns when dry brushing to get the best effect. Also, you should also make sure to do a wash prior to dry brushing. 

Let's Make Cosplay: Creepy Book


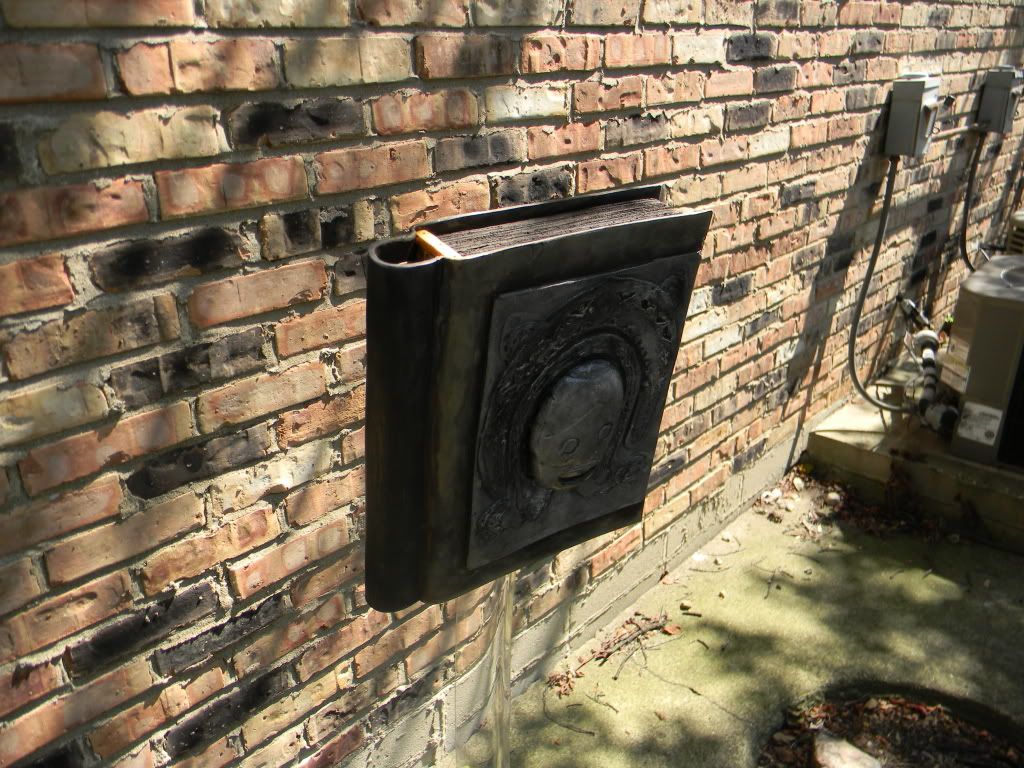
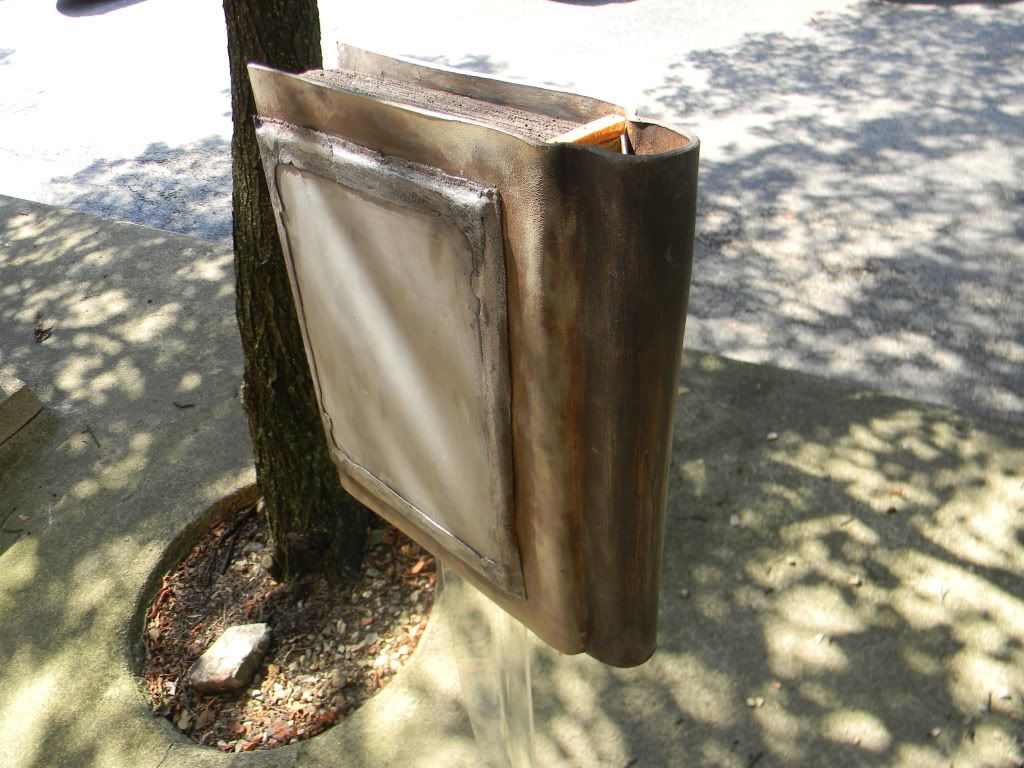
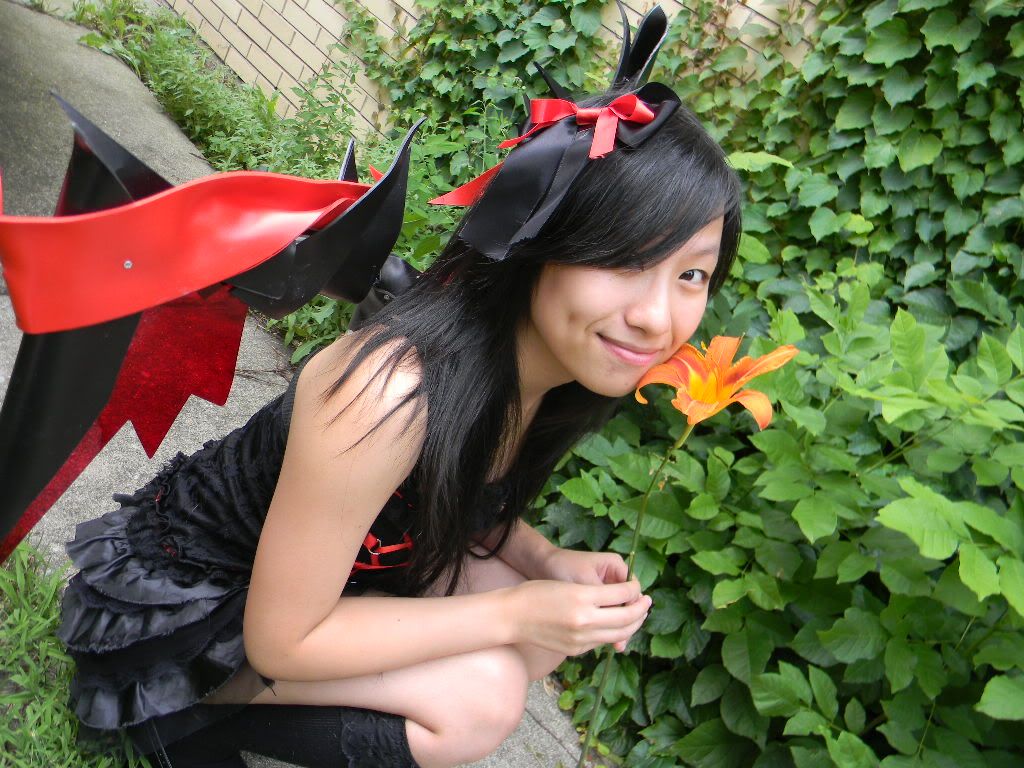
This book was made for a person who suggested it as a prop. The premise behind this book would be that it would look like it was floating. The person who wanted the book suggested that we use acrylic but that really didn’t work because it would be too heavy if it was made purely out of acrylic. He also wanted to make sure that it bounced and looked like it was moving while it was floating.  You can find all the videos corresponding with this prop on Youtube at http://www.youtube.com/user/FinalCosplayCorps/search?query=Creepy+Book .

The list of materials I used are as follows: 1 inch eps foam, 1/4 inch eps foam, 1/4th inch MDF, twist ties, poster board, 1 carbon fiber rod, 1/8 inch pvc sheeting, heavy bundling wire, strapping, wonderflex, paint (you will need tan, black, brown, gold, and silver), fishing line, varnish IPS weld on 2007, cement glue, #4 half in, Philip flat head wood screws #8, 1.5 inches Philips flat head wood screws, and finishing nails. 

            The tools that I used were as follows: hand saw, exacto knife, heat gun, sculpting tools, yanky push drill, Philips screwdriver, hole puncher, dropper, syringe dropper, dremmel, box cutter, rasp, file, scissors, sponge brushes, colored fine tip markers, rulers, and circle template.

The fist thing you're going to need to make is the support structure. This structure is going to be your base. Without it there is really no way the prop will be able to sit up properly and be supported. The support structure will have two parts; the book and a harness structure that will be the base to hold up the book.

           For the book, the easiest way to have done this would be to make it out of foam. However, foam is not extremely strong and it is easily damaged. You could easily have gaping holes where you can see the inside foam. We will start with the foam and later add PVC to cover over it to protect it.

           
            The harness will push a plate onto his back with two brass tubes. The brass tubes would be where the carbon fiber rods would slide in and as such would fit snugly, giving the allusion that the book was floating. If the tube wasn’t in the right position you could bend the tubes to be in the right position or you can bend the tubes to bring them up up or down to shift the friction and make it easier or harder to take off.

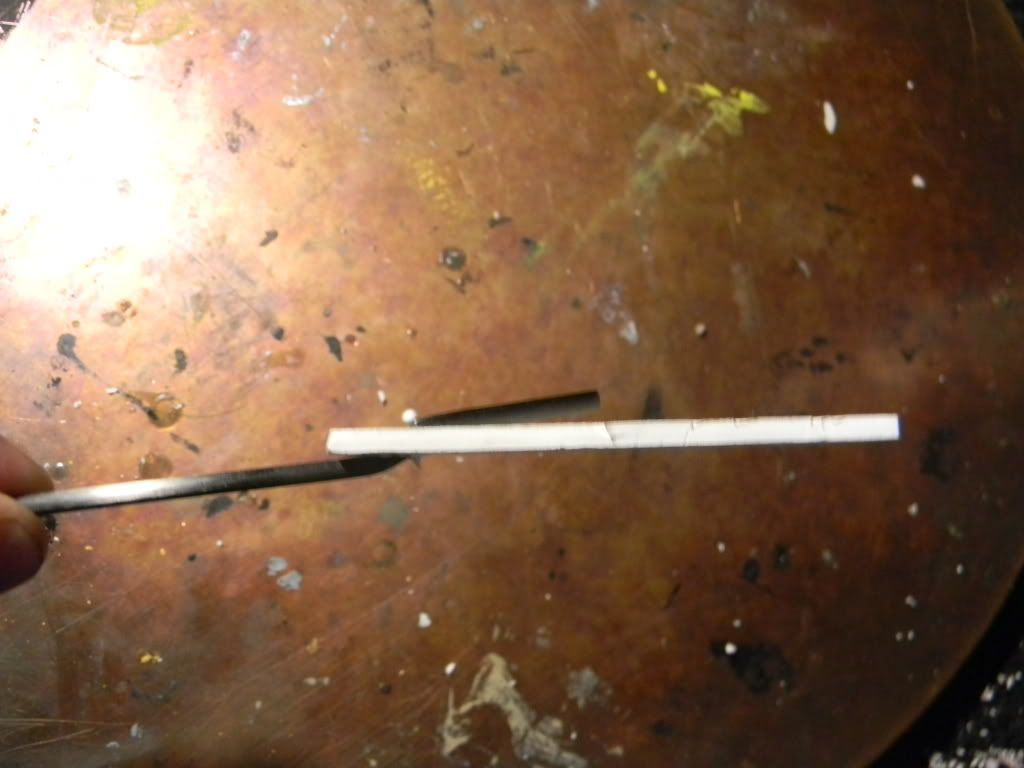
                In order to make the book bounce I chose to install carbon fiber rods to make the book wiggle a bit and allow it to bounce. When completed, the book will look like a book with two rods sticking out of the bottom. In the original design, the carbon fiber rods were supposed to go through a jacket and get into the tubes.

First, you will need to heat up the carbon fiber rod and bend them before you tie them down to the foam. To attach the support plate to the foam I drilled holes in so that there was a place to use twist ties to hold the carbon fiber rods together to the support plate. The plate is in the center of the book to take all the weight so that everything can be mounted to the support plate instead of the foam. After that, I took two pieces of foam and cut them to the size he wanted and then cut a piece of 1/4 inch foam sheeting and made a hole in it so that it would fit so that it looked like two pieces of foam with another piece sticking out. This was all glued together with insulation 78.

Obviously foam is not the most durable material so the cover of the book is going to be made with PVC sheeting. It’s also thermafomable so you can do the entire book binding in one piece with the PVC sheeting. I took a big rectangle and shaped a binding by folding over the edges twice.

Next, if you look at reference pictures, there were metal bits on the inside of the binding. To recreate that in the prop I took some wire and bent u shape staples. I painted them in black then gold before I mounted them into the PVC and then mounted the PVC to the foam since it would be hard to paint after it was mounted. After that, I painted the inside cavity so that that section would be done. I would normally paint everything last but since this was an interior piece and there were other details going on top of this stuff it was necessary to paint it first.

In order to give the book more protection I cut some pieces of mdf wood to cover the book and make sure that it was protected. The book was only around half a pound but it was still kind of heavy for what it was made to do.


With the back and binding done it’s time to work on the face. I positioned the face and then realized that I had to cut off a chunk of the front cover so that I could inset the layers that were going to come on after it. I heated up the PVC sheeting, cut it out, put a depression in the foam to accommodate the face and details of the book. Unfortunately, this required me to reposition some screws that were mounting the front cover, back cover, and foam to the central support plate. After I adjusted the screws and made sure that everything would be covered up and they provided the necessary support I took another bit of PVC sheeting and heated it up before I pushed it into the hole.

I then began to work on the decorative cover, making sure that I had it all glued together with ip 2007 plastic glue. Making sure that it is screwed and glued ensures you that it definitely mounted. Make sure that everything you want done is done correctly before this step because you won’t be able to pull the prop apart after this.

After that, I sanded up the binding so that I could give it a correct texture. I used a rasp to give it the scratchy look and after that I began to work on stencils for the details that were going to go on the book. This is where you basically try your best to recreate a specific pattern or detail that you want.

After this, I created a decorative edge for the back with wonderflex. In order to attach the wonderflex you will need to heat it up with a heat gun before you put it on the back. This will cleverly hide all the screws as well.

After I’m done stenciling and putting on that edge I put on the piece of one inch foam and draw the face onto the foam as much as I can. After you draw on the face, you can use your rasp and start cutting into the most defined areas. Leave areas that are supposed to stick out alone. After you do that, you might go back in and redraw the face again so that you can plan how you’ll carve the rest of it. After you’re done carving the face you will need to get some more wonderflex and heat it up before you stretch it all across the foam face. Press the wonderflex firmly against the foam so that you can get all the details. Using sculpting tools to do this will help define your lines better. The wonderflex is strong and durable and ensures that you won’t have foam pieces breaking off of the book. After you’re done with the wonderflex, you can put your stencil up to the top of the book and make sure everything’s stenciled right. Do NOT use sharpie or marker because that will bleed easily. Use paint or a base coat so that it won’t show through the paint. Put everything in where you want it to go and make sure everything looks in place.

Once everything is in place, mark everything on the wonderflex before you slowly take out the warm wonderflex off of the foam. Then you can slowly carve all the details out of the wonderflex and paint it. Make sure you cover the prop with a base coat. Start off with a flat color, especially because we will need to dry brush later to give the book an older appearance. After you paint the book with a base color you can wash the entire thing (paint washing the entire prop allows for the foam to take on some more texture). I used grey as the base coat for the silver paint. Don’t forget, you HAVE to base coat anything before painting with metallic paint because metallic paint tends not to stick. I also washed the inside of the book because there are lots of cracks and crevices in the book and I wanted to pull out all those details. The only part that you should not wash is the portion with the gold detailing because the gold detail looks so new and shiny.

Once you have the binding on the book you should take a saw and run slits down the foam to make it look like the book has pages. You will need a really fine blade to do this job because if you use a thick blade it will not look realistic. After that, you can take a rough sanding sponge and run it down the lines so that it looks more like pages and thus mitigates possible damage.

Now it’s time to dry brush. The key to dry brushing is that you take as much paint off the brush as possible. Brush specific areas and then go into deeper areas to pound the pigment in. You should stay with blacks or dark browns when dry brushing and it is best to dry brush after putting the wash on the prop.

After this, I painted the silver pigment on the face and put a black wash onto it to bring out the details on the face. If you didn’t wash the face it would be much harder to see the detail when you take a picture of the prop. After that, I painted the back with a un-uniform metallic silver. To do this, you need to put blotches on the paint and then work into the paint that is already on the surface.

In order to define one of the edges of the book I took a dry brush and began brushing a lighter color on at an 90 degree angle to make it look like it had more of an edge on the side that was being used the most. I used a tan bit on the binding on the side and for the pages because you are trying to  bring out different which brings out the emphasis on how pages look. You want to do this same technique with raised edges as well. However, make sure you are not using metallic paint with this technique because you cannot see the detail.

After you are done painting you will just need to put everything together.

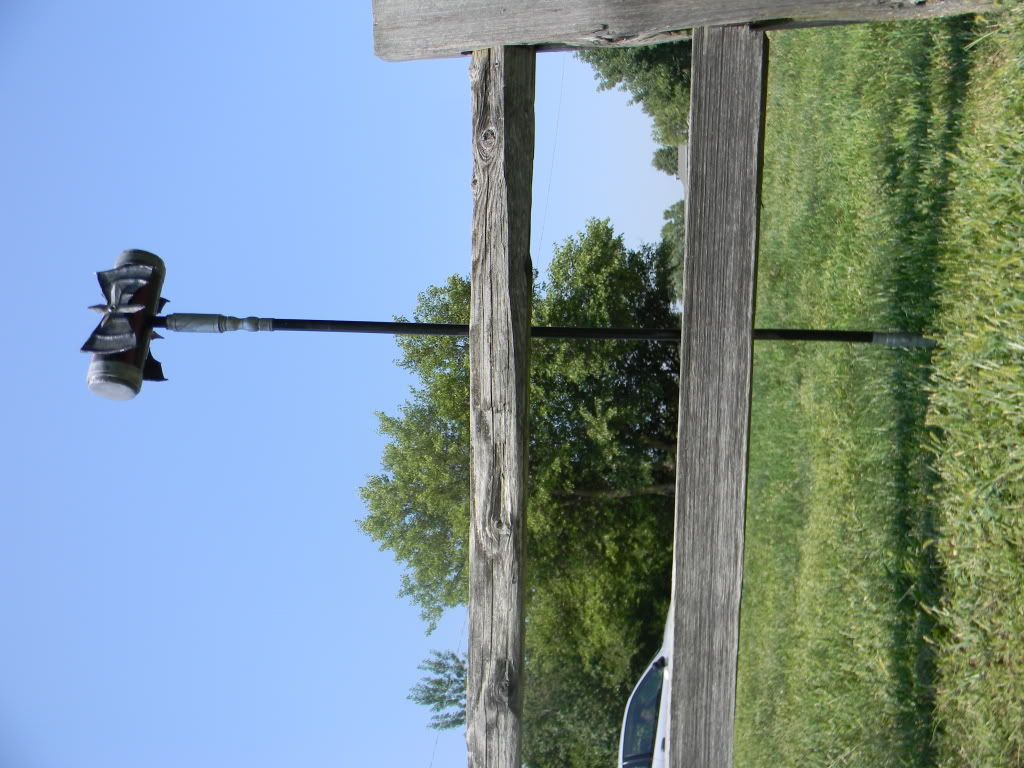
I chose to finish this prop a different way because the person who wanted this prop wanted the prop to extend much farther than what we agreed upon. I chose to finish this with a stand which involved me taking long strips of acrylic. I heated them up and bent them (one piece for a central stand and two for smaller legs to make an X). You can glue these together with IPS #3 for acrylics and then set some screws in there to ensure that all three pieces are stuck together. Unfortunately, with the new method I went about this I had to open up the book again so that I could adjust how I was going to mount this. I opened the book up and cut out the carbon fiber rods and I used the screws that were holding the book to the center plate to stop the acrylic sheeting when it was inserted into the book. I cut a notch into the foam so that there was a slit for the plastic acrylic to slide into the book and hit the screws. The foam allows the book to be held in place on the acrylic sheeting.

Do note, a piece of acrylic is not really strong enough to hold weight, especially in wind. It will flop over. I heated up the main shaft and curved it so that it would have more strength and be able to hold more and be more resistant to breaking. Bending the plastic gives it more area to apply force as compared to a straight piece that is easier to snap. I also attached another piece of plastic on the base of the main piece of acrylic that is going straight up to add additional support. The pieces of clear acrylic sheeting look like a pyramid. Do your best to keep it blemish free because if you scratch it the effect will be damaged. If you don’t look for it you cannot see the acrylic stand. However, since the prop is extremely top heavy a good wind will knock it over. Be VERY careful when you’re moving around. I suggest that if you’re walking that you should take it off and put it on only when you’re getting a picture taken.


That’s it for this prop! As always, if you have any questions please feel free to email us at finalcosplaycorps@yahoo.com! 

Sunday, November 6, 2011

Let's Make Cosplay: Prop Sword


This was an interesting prop that I had made for one of my assistant’s friends.

I used the following materials: 5 inch pcv pipe, 3 millimeter silver acrylic sheeting, IPS Weld on #3, friendly plastic, resin, a carbon fiber rod, EPS foam, plastic skulls, 3M insulation 78, plaster of Paris, white glue, hot glue, #4 half in, 4 inch Philips flat head wood screws, one inch philips flat head wood screws, and black and sliver acrylic paint.

I used the following tools: a hand saw, a hot knife, a heat gun, a yanky push drill, a Philips screwdriver, a rasp, a file, sponge brushes, an 80 grit sanding sponge, a mixing container, some mixing sticks, paper towels, a fine tip marker, and some rulers.

To start off this prop, I began with cutting the silver acrylic. Now, most people probably won’t be using this because it is extremely expensive and rare to find. However, I chose to use this material because of its look. I began by drawing my template onto the plastic. Your sword will differ depending on what sword you’re looking to create and the reference art you have.

In order to create a crisp ridge along the spine of the sword you’ll need to use the hot knife to cut in the middle of the sword before you bend it. The line that you cut into the back of the blade will make a sharper edge. After you make this incision you will need to start heating up the acrylic before you can start to shape the sword before you put these two pieces together to form the sword.

After you have finished molding both sides of the sword pieces you will need to put both pieces together. You should start by taping these pieces in place so that the pieces line up correctly and that they match each other. Slowly use the heat gun to heat up both pieces of the acrylic pvc sheeting while gluing them together with the ips weld on #3 for acyrlics. Be careful with the heat or you may cause the plastic to deform. This process is also very difficult because you need to make sure you seal the entire sword up completely or the resin will leak out.

Note: If you find that you have holes when you pour in your resin you can use some friendly plastic to seal those holes temporarily until the resin hardens. I checked to see if it leaked by testing it with water and plugged all the holes with friendly plastic before I went any farther.

Before you pour the resin in you want to insert something into the blade that reinforces the structure a little more. I used a carbon fiber rod and a long piece of PVC pipe down the length of the sword. This would be reinforced by the resin and allow for more stability and rigidity through the entire prop. After that, I filled the entire sword with resin and allowed it to harden and dry.

While that’s sitting you can focus on the more complicated parts of this prop.  I definitely found this to be the ribcage and the arms. I cut EPS  foam for all these pieces and used insulation 78 spray to glue them all together. Insulation 78 spray is really easy to use. All you do is spray the pieces that are going to be stuck together, rub the pieces together to make sure that the entire surface is covered, let it sit for a bit so that all sides can get slightly sticky, and then put those pieces all together. After all the pieces are stuck together you can begin to use the rasp and files to cut the basic shape out.

Some people ask about you can manipulate the texture of foam. The texture of your foam differs with how well you sand the foam. Sanding foam is much easier to sand than other materials. For this prop, a more pitted look was more ideal so I left it that way. I made some plaster of Paris to paint onto the foam and fill in details. After the plaster of Paris is dry you can work to sand the plaster of Paris to work on whatever form you want to make.

Now we want to attach the entire piece together. This is EXTREMELY IMPORTANT because you need to make sure the entire prop is well supported throughout the entire piece. If there isn’t good structure there will be no way to do any action with the prop without it breaking so make sure that your prop is structured well throughout. The blade is well structure with the PVC rod, carbon fiber rod, and resin. You will need to make sure the handle and the base are well supported as well.

I chose to attach the chest piece onto the sword before putting anything else onto the blade. I attached this piece with hot glue.  

After that, I used the hot knife to cut through the plastic of the blade where the sword arms would be inserted and stuck in before I cut out the section that the handle would be inserted in.

In order to get the skull details on the sword, I used the plaster of Paris to fill the skulls to give them more rigidity and strength. The horns that went onto the sword were made from pieces of PVC sheeting cut into triangles. Lightly heat them with a glue gun before you wrap them into cones.

After these details were done, I used the hot glue gun to mount the arms in place and to attach the skull onto the sword. In order to make sure the skull stayed on the prop I inserted a screw into each skull which also held open the jaw for a more eerie and creepy look. You will need to put filler into the sides of the skulls to make them look nice. White glue and plaster of Paris will get the job done.

After that all that is done it is time to paint the skull section of the prop. I used acrylic paint mixed with plaster of Paris to paint the skulls. The reason I mixed the paint with the plaster of Paris was to ensure that in case the skulls got damaged the paint job wouldn’t matter too much because it would be painted all the way through.

After this it’s time to finish some more minor details for the prop. I made the decorative bits for the handle and the tip of the cone out of foam. It’s much easier to sculpt and shape the detailed bits from foam. After you cut those pieces and finish them you can glue and mount the decorative bits for the handle. Then you can move to cut the grip for the handle from the foam. You can use the same trick for the sword to do the grooves of the handle, cutting in the middle before you cut out the curves. These curves go on the outside and is purely decorative. After that, you cut the triangles out for the spikes.

After all the foam pieces are cut cover all of it in modpodge. This is to give it elastic resistance to cracking. By covering it in modgpodge the prop will take damage and the paint will stretch. I personally used three layers of modpodge on these pieces to make sure that they were fully covered.

After that I primed all the foam and everything else that hadn’t been painted to be painted, using a black paint to cover everything. Don’t forget, priming pieces with paint before you do your paint job is very important! After the black primer coat was dry I began painting the silver. I used a dry brush to brush on the silver paint and dabbed at the prop with the brush so that the prop looked like it was made out of bone and that the dented parts looked more dented.

That is the basic gist of how I made this prop sword! If you’re interested in more details, please check out all the related videos on our youtube, located at http://www.youtube.com/user/FinalCosplayCorps . If you search prop sword you will find our individual videos for that project! As always, if you have any questions, feel free to shoot us an email at finalcosplaycorps@yahoo.com or find us on facebook at https://www.facebook.com/pages/Final-Cosplay-Corps/201702463225417

Wednesday, September 14, 2011

Let's make Cosplay: Batty Hammer


Hello! This blog post for Let’s Make Cosplay is dedicated to the Batty Hammer! I accidentally broke one of my girlfriend’s props and so this was what I made for her to make up for that. If you want to see more detailed videos about how to make this fun prop, check out Knives' videos on Youtube at http://www.youtube.com/user/FinalCosplayCorps/search?query=Batty+hammer

First things first. Here is the list of materials and tools you will need.

                Materials: You will need: approximately five feet of 0.5 inch pcv pipe, around 3 feet 0.5 inch dowel rod, 3/4 inch PVC pipe, one inch PCV pipe, wonderflex, resin, a 4 inch cardboard tube, EPS foam, 3M insulation 78, #8 one inch Philips flat head wood screws, washers, black and sliver acrylic paint, and varnish.

Tools: You will need a hand saw, an exacto knife, a heat gun, a dremmel tool, a yanky push drill, a Philips screwdriver, a rasp, a file, some sponge brushes, a paint brush, a 80 grit sanding sponge, a mixing container, some mixing sticks, some paper towels, a fine tip marker and rulers.

The first thing we have to do is layer the PVC pipe for the handle. In order to do this you will need to heat them up with the heat gun to make them expand. After you do that you’ll need to fit them all up into each other. The half inch PVC is for the handle. You will put the 3/4th inch PVC pipe over that and 1 inch over that. You will be putting the hammer head on the top of this pipe and adding the stuff on the bottom of this setup.

In order to avoid sculpting all of the parts I decided to choose to layer pieces of pipe over other pieces to achieve the same effect. However, since the pipes are different thicknesses I chose to do other details with wonderflex.

I chose to utilize a half inch dowel rod to give the handle more rigidity. I inserted the wood into the bottom so that it could give some support and act as a plug for the bottom so that I could pour resin into the entire handle portion and around all the different size tubes. If you would like to learn more about mixing resin please consult the blog post for that. I have realized that it’s much better to fill the entire base with wood, so next time I may choose to do this method with more wooden dowel rods.

Now we need to move to the hammer head. I wanted to create a dented metal look so I chose to make the endcaps out of foam. Since foam has a frazzled and weird texture it can be painted to look like dented metal. It also makes the end caps nice and soft so if the weapon is actually used it won’t hurt on impact, thus making it safer for photoshoots.

You will need to start by cutting slits at the top of the handle. After you cut these slits you are going to heat them up and bend them so that you can turn them into tabs that can hold screws that will go into the hammerhead. After that you will need to begin sculpting, shaping, and carving the designs with a handsaw. After the detailwork is done you should get the wonderflex (which is good for detail work). Heating up the wonderflex allows it to be applied to other surfaces (you can heat it with water but I prefer to heat it with my heatgun). I completed the bottom of this prop with wonderflex scraps. Never throw away wonderflex scraps! You never know when you’ll need them!  

After you’re done with the head of the hammer, heat up the top of the pipe and start attaching the head of the hammer to the handle. Make sure you put in heavy screws. Note, this is a bad support structure for a prop like this but this is a very small hammer so no big deal.

Next we’ll work on the wings for the hammer. Again, using wonderflex for this is great. I chose to cut the frames out before I cut and stretched the wonderflex and formed the wings over scrap to do the raised part in the wings (similar to sculpting it out of clay). Just make sure you keep it in its shape until it’s cool or the shape will fall out! I chose to make the crosses out of wonderflex as well since it mounts well to itself once it’s heated up.

Now to get started with painting. Make sure you PRIME everything before you paint it. If you don’t, the paint job will be inconsistent. Plastics ESPECIALLY do not take paint well so you have to prime the materials with a base coat first.

Once you’re ready to mount everything else together after priming the prop, grab a washer and set it on top of the crosses and wings before you screw it all together onto the hammer. The washer protects the wonderflex from the screw so that it won’t rip through the material.

After that, start working with the silver paint. Metallic paints are weaker for pigment so you’ll need to base coat over the primer with a similar color. I chose to spray paint the head of the hammer. HOWEVER, note that spraypaint eats through foam. If you choose to spraypaint the hammer make sure the areas with foam are well covered. Tape off areas that you aren’t painting a specific color and go back to those sections after the paint dries and you can take off the tape safely.

In order to give the prop a more defined look I chose to base it in silver paint before I did a black wash. The black will go into all the cracks and crevices and shows the details of the hammer much more clearly.  After that I did some dry brushing to illustrate some more wear marks and dents. The dry brushing leaves some ray edges as highlights where it’d be more shiny in war and it also allows other parts to have more shadows.


There you have it! A batty hammer! As always, if you have questions, please feel free to contact us at finalcosplaycorps@yahoo.com and check out our videos on our Youtube channel! 

Saturday, September 3, 2011

Lets Make Cosplay: Mecha Chibi Wings


Hey guys! This is the blog post containing the instructions for Mecha Chibi Wings! A viewer asked for this tutorial but she’s a teeny tiny Asian girl so big mech wings won’t work for her. Chibi wings are much more reasonable for a girl her size to carry and wear around as part of a cosplay. If you're interested in looking at the videos which have more details about how to make this fabulous prop, please check out the videos on Youtube at http://www.youtube.com/user/FinalCosplayCorps/search?query=mecha+chibi+wings

The first thing you want to do before you start building any project is to make a preliminary plan or schematic. I recommend you try to make a plan or schematic for a few reasons.


1.       You can use a schematic to estimate the cost of the project by planning out what materials you are going to use, how much of it you will need to buy, and any equipment you may need. It allows for you to start a rough budget what you’re going to do, which is always good when your checkbook is feeling a pinch! I always price my things on the back of the schematic to see how much my project will roughly cost me. As a side note to budget management, the key is to not do a lot of big projects frequently. I have a huge mech project like once a year or a big project that’s like $600. That’s bad as a huge chunk but not as bad if I break it down into small payments over the course of the year.
2.      Creating a schematic also allows you to plan out how you’re going to create the prop so that you’ve got a guide on how you’re going to do it and you aren’t fumbling around as you make the prop. This way you can try to foresee some problems that might occur and adjust for them ahead of time so you don’t waste materials (and money) later on.
3.       A schematic also gives you an estimated weight and look of the final project.

Alright, so before we get started you’ll need your tools and materials. For this project we needed the following materials. You need 3mm. PVC sheeting in red, white, and black colors. You will also need 3mm. transparent red acrylic sheeting, IPS Weld on #3, a 2 mm. carbon fiber rod, two push release key rings, some medium density fiber board (MDF), #4 half in, some Philips flat head wood screws, marine power PC 11, and some black and red acrylic paint. The tools you will need include a hand saw, heat gun, yanky push drill, Philips screwdriver, pliers, rasp, file, sponge brushes, 80 grit sanding sponge, fine tip marker, and rulers.

The first thing that we want to make is a back support.

Having a back support piece is crucial because it allows the weight of the prop to spread across your entire back so you aren’t putting the entire strain on your shoulders. If you watched the video you can see what kind of shape I cut out and how I molded  it to my body so that the weight isn’t all on my shoulders. This kind of back support spreads the weight evenly across my entire back and it is heat formed to fit my body so it’s nice and comfortable.  Having this kind of a back support is so much nicer than having to put all the weight just on my hips, shoulders, or my back.

With that being said, the first thing that were going to do for our chibi wings is make the back support. Since we are making heavy ones and not your typical feather wings, you will need a plate to steady the wings so they don’t flop everywhere. You will also want something to harness the wings to (like a bra).

We’ll start off with a piece of PVC. The reason we choose to use pvc is because it is thermaformable. For her, I want this to be 8 inches by 4 inches. I cut out two separate plates. One of the plates is going to attach to the bra later on and another one of the pieces will attach to the wings themselves as the main support.

If you look at the first video you will see what kind of shape I chose to cut out.  You will need two of these pieces cut out. The reason for this second piece is so that it will support the wings on your back to make sure that they don’t flop over.

After you’ve figured out how big you need it cut to fit yourself you can cut on the plastic. If you’ve never cut plastic before I have posted a tutorial online for that and you can check it out (NEED LINK). As you cut, be aware of the angles that you are cutting. Some of these angles may be very small and it will be harder to cut from that side. Cut from the side with the widest part that needs to be cut and move to the smaller angle.

Now that you have both your parts cut out, we need to punch some holes in so that we can create supports on the side so that these wings will stay even and not sag in one direction. In order to do this we’re going to drill some small holes. The more holes that you put in means the more support this piece will get since the weight will be distributed over a large area. I’ve decided to put nine holes on each side.

Now guys, this is super important. When you drill these holes make sure that these holes are ¼ inch apart. If you put them more apart then you put extra pressure on the thread you will handstitch in later. If you put the holes closer together the thread can saw its way through the plastic over time.

So now you’ve got two plates cut to fit you with the holes punched in. Time for your next step. Pick one of the two pieces as the one you want to strap to the bra. This will be what pushes against your body and supports the rest of the piece. Now make sure that you file down all the corners. The last thing you want is for some sharp and pointy corner to be digging into your back.

After you file all the corners and make sure they’re rounded off you’ll want to get the heat gun. We’re going to use that gun to shape the support so that it molds to your back. You’re going to want to roll the edges up a little bit so that they don’t push into your skin. This piece will be under whatever costume she’s wearing. The other piece will be on the wings itself and doesn’t pose as big a problem. This piece that we’re working on now ensures that she can put the wings on or take them off without taking off her shirt. Mark this piece with an X so you make sure that you don’t confuse the two pieces.

So we need to have these lock together. The piece that you want to be directly on your skin on your back will be worn underneath your shirt and the piece that connects to the wings directly will be on the outside.  We need to have these lock together quickly and easily. For this she will need to put a buttonhole on the back of her shirt or have a shirt that buttons up in the back. The bra will support  the wings. Hopefully we will make these wings as light as possible and we won’t put too many elements into this.

So here we’ve got two small rings and two small clasps. These are going to be used to lock our wings to the support. We want two of them to make sure that the wings don’t pivot. What we need to do is insert the clasp into one piece and we want to insert the two rings into the other piece.

So how do we get these rings onto the PVC? Well, we are going to start out by drilling a hole smaller than the ring itself. We will need to make a hole in the middle. You will need to make sure that the tool you are using will drill a hole smaller than the ring. Carefully push a hole into the middle of both pieces of the back support.

After you’ve pushed your hole in, pick up your heat gun and heat the PVC. Be careful to make sure that the plastic doesn’t bent its shape. We want it soft enough that it will be easy to fit the ring in. Go ahead and poke the ring into the hole. The ring has small lips and we want to make sure the PVC wraps around those edges.

Now we’re going to put the clasp into the other piece. This one we want to mark because we have to make sure the clasp and the ring line up are even. If they don’t line up the prop will be unbalanced and structurally weaker. After you mark your hole, drill into it again. Keep in mind that these fittings need to be really snug. If they aren’t the props won’t hold properly and they won’t be as structurally sound. This side we have to make sure we know what side we’re putting the clasp in. The other one didn’t matter as much because the ring is the same on both sides. Since the clasp has buttons on one side that lock onto the lip of the rings we need to make sure that we insert the clasp so that the buttons will match on the right side to push the panel with the support.

As a note, all of you can likely see that there’s a small gap between the two panels. That is to allow for her shirt to sit in between the two panels. Don’t worry about that. The wings will stay stable as long as we put two rings and clips.

Now it’s time to start the actual wing parts. I chose to go with matte colored PVC because it is easier to work with. Acrylic is nicer and more pricy but I use different tools for that so to keep it simple for this prop I chose to go with the matte.

Draw your wing frame shape out first. After you draw this out you can begin sawing out the pieces from the PVC. MAKE SURE that you keep things small when using acrylic vinyl. PVC sheeting is fragile so try to keep them small to reduce the risk of damage. I chose to use MDF for the base of the wing frame. Since this is just the frame it doesn’t need to be thermoformed or altered. It just needs to be cut. This material is stronger and cheaper so it’s good to use.

As you see at 4:40 in the 3rd video of the series, located at http://www.youtube.com/user/FinalCosplayCorps#p/search/10/Bpr5V0srvlM you can see that I chose to use more of an L shape. This will be how the wings stick out from the back. I will have two pieces of this cut with one piece of acrylic in the middle and I will put as many screws through these pieces in the middle as I can so that it will hold in place without breaking.

Since you need one for each side you will need to cut a total of four L pieces of the first PVC and two L pieces with the acrylic. This way you have two pieces of regular PVC and one piece of acrylic for each side. After you cut all your pieces we will need to put the screws in.

To make sure that the wings can have a little bit of spring we will have to make sure that we don’t mount them directly to the center piece. To do this we will mount them using an acrylic rod. The rod I chose to use was a 2 millimeter rod. It’s thin but it’s still really strong. I’d suggest using carbon fiber rod. It’s pretty expensive so I’d recommend just getting what you need (any specific amount). DO NOTE: One problem that you will have is combining the materials. I don’t have the really strong cement stuff that you’re supposed to use but for now I’m going to put it into the center piece.

In order to get this rod in I need to drill a hole big enough to thread the rod through. You will want to put this hole about two inches in from the end of the wing frame. After you drill the hole you will heat up the carbon fiber rod and set it between both frames before you bend it so that both ends are parallel with the frames and they stabilize the wings to the support. After you attach the wings that way we need to make supports to make sure that the wings won’t snap off. I chose to make a triangular section out of MDF right underneath each wing so that it would help prop the wings up.

After you’ve got the base done you’ll need to pull out your colored PVC. Cut your pieces to how you want them to look for each wing. We will be screwing the PVC into the support before we use the heat gun to thermaform the plastic. Notice that we’ll be layering all the PVC strategically so that each upper layer covers over the screws underneath it.

When you heat this plastic you need to make sure the gun is always moving and that the light is just on one part you get hot and cold zones . You can warp the plastic or burn it if you don’t do this correctly. Also, you need to be very careful when dealing with acrylic PVC. It’s super fragile but can be thermoformed. However, it melts at a much lower temperature so be careful when you use it.

The girl who suggested this prop ended up getting thick bindings to use. She picked up bindings similar to the ones that are used on backpacks and that is how she added additional support in addition to the back support.


There we go! Chibi Mecha Wings! If you have any questions please feel free to ask! 

Who and What is the Final Cosplay Corps?

Final Cosplay Corps (FCC) is a group of extremely dedicated and passionate group of cosplayers who avidly attend anime conventions around the country. The group is made up of a great bunch of people who love to create impressive works of cosplay. However, the members of FCC are just as dedicated in trying to help other cosplayers reach their highest potential as well. Everyone involved with FCC started from the bottom and worked to achieve the workmanship they have now. Contrary to many elitist cosplayers, the cosplayers in FCC take pride in helping other fellow cosplayers learn how to improve their skills. They understand that everyone needs to start somewhere and love to help others grow and learn more.

FCC started unofficially after Chris Farabaugh (Millions_Knives) went to his first anime convention and decided to work on large cosplays after that. Since these cosplays often required the help of multiple handlers, Chris and his friends often worked together to make sure that he could get around conventions without risking other people’s safety. The group officially formed at Anime Central in 2008 and was finally titled Final Cosplay Corps at the C3 Picnic in 2008.

Knives often looks for people with a variety of skill sets to join the group. Also, he respects all cosplayers that do their craft well, even if their craft utilizes materials he personally prefers not to use. He is trying to gather people with various developed skills to join FCC so that the group can help each other and others.

Currently FCC is broken up into three divisions, Core Members, Ninjas, and the Tactical Squad.

The core members are the members who specialize in cosplay construction.
Chris Farabaugh: millions_knives: Specialization in Prop Constuction
Seneca Farmer: This_chick 25: Specialization in Sewing
Amanda Saleski: haku_hei: Specialization in 2-D Design
Eric Kubicek: spazchan: Specialization in Steampunk
Bret Luitze: Akiba64: Specialization in Cardboard Prop Construction

Ninjas are members who choose not to cosplay or help with construction but help the group with other things.
Blake Williams: djeclectic: Ninja of Automobiles and Music
Trent Wexler: rawkz0rz: Ninja of Visual Effects and Media
Kim Jarvis: gadgets: Ninja of Tranportation
Jon Norman: xenoblade: Ninja of Heavy Lifting
Savannah Watkins: sweet_sunshine: Ninja of being a Chibi (Real Designation TBD)

Members of the Tactical Squad handle matters online, whether it be video promotion, blog posts, and all that fun jazz.
Sirin Avci: Fullmetal_C: To Be Announced
Nicholas Pollitt: Kasin: To be Announced
Kasey Zhong: Kasemei: Tactical Supervisor of the Facebook and Blog Posts

Have any questions for us? Please feel free to contact us via the Youtube page or here!